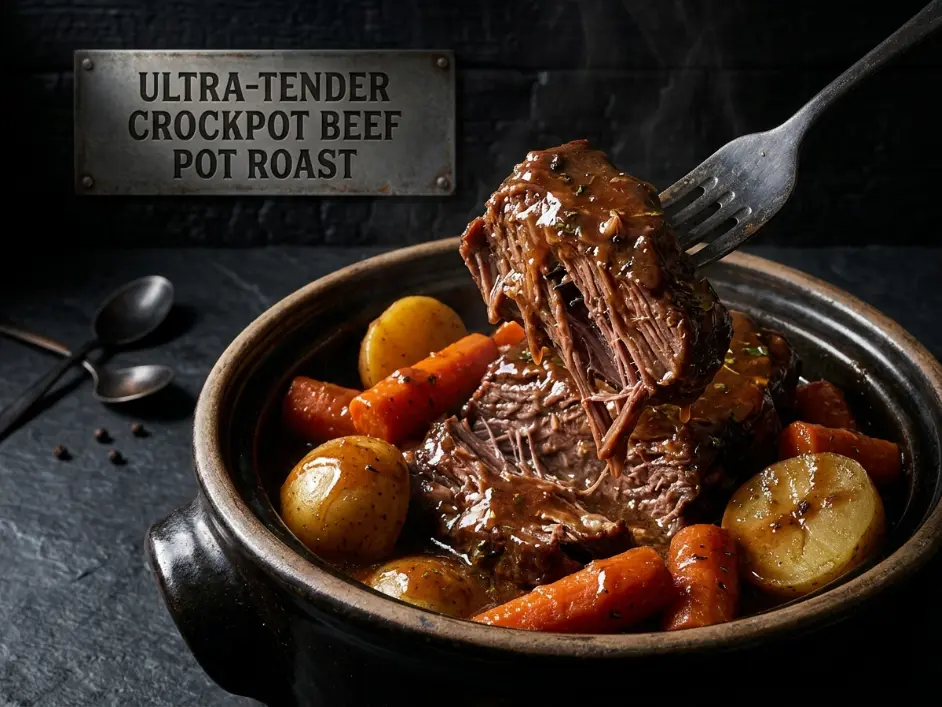
5 Flawless Molecular Rules for an Ultra-Tender Crockpot Beef Pot Roast with Carrots
The Fork-Tender Dream vs. The Stringy Nightmare
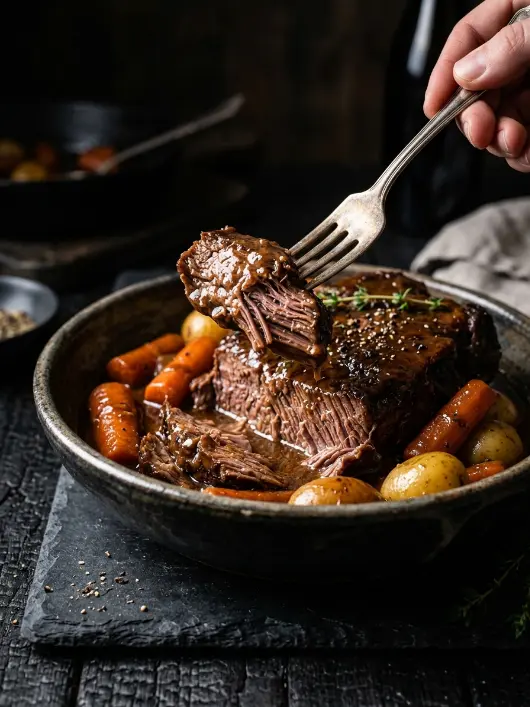
There is a precise moment when you lift a fork to a piece of slow-cooked beef and it yields without resistance—the meat practically melting into submission, releasing a cascade of savory, silken juices that pool into the gravy beneath. That is the moment worth waiting eight hours for.
Then there is the opposite. The pot roast that fights back. The one where the meat fibers remain stubbornly intact, requiring aggressive chewing that turns the experience into work rather than comfort. Some home cooks blame their cut of meat. Others assume slow cooking is enough. I have tested this method across dozens of batches in the Expert Palate test kitchen, adjusting one variable at a time to isolate exactly what makes the difference between a split, oily mess and a perfectly bound, velvety emulsion.
The truth is simple: an ultra-tender crockpot beef pot roast with carrots is not luck. It is precision.
The science matters. The timing matters. The sequence matters. And once you understand the five molecular rules that govern slow-cooked beef, you will never produce a disappointing pot roast again.
5 Culinary Secrets to the Ultimate Cheesy Spinach Artichoke Dip in a Bread Bowl
The Thermodynamics of Collagen Cleavage and Myofibrillar Tightening
Here is where most home cooks stumble: they assume that slow cooking is simply “low heat for a long time.” That oversimplification is exactly why their pot roasts fail.
What actually happens inside the meat during low-temperature cooking is a battle between two competing chemical processes. The first is beneficial—collagen, the tough connective tissue that makes raw beef chewy, begins to break down into gelatin, a slippery protein that lubricates the muscle fibers and creates that sought-after tender texture.
But here is the catch. If you cook beef too hot, too fast, or with inconsistent temperature swings, the myofibrillar proteins (the actual muscle fibers themselves) contract and squeeze out their moisture before the collagen has time to fully convert. In simple terms: the meat dries out while the connective tissue is still tough. You get the worst of both worlds.
The crockpot solves this problem by maintaining a precise low-temperature environment—typically between 160°F and 180°F (71°C to 82°C) depending on the setting—which allows the collagen-to-gelatin conversion to happen slowly and completely while the muscle proteins remain relaxed and juicy.
Here is the molecular transformation in its simplest form:
Collagen+H2O+Controlled Heat (160°F)+Time→Gelatin
The gelatin acts as a natural emulsifier, binding water and fat into a unified gravy structure. This is why properly slow-cooked beef tastes richer and feels silkier than any oven-roasted version—the gelatin is literally holding the flavors and moisture in suspension.
In simple terms: low heat + time + moisture = a transformation that oven-roasting simply cannot replicate, no matter how carefully you monitor the temperature.
According to verified nutritional data from the USDA FoodData Central database, well-marbled cuts of beef chuck offer the ideal fat-to-collagen ratio for this exact process. The intramuscular fat becomes self-basting, and the collagen content is high enough to create a glossy, luxurious final gravy.
Pro Sourcing and Ingredient Selection
The ultra-tender crockpot beef pot roast with carrots begins before the crockpot is even plugged in.
Visit the butcher counter and look for a center-cut beef chuck roast with visible marbling—those white veins of fat running through the meat. This is not a place to economize. A well-marbled chuck roast costs slightly more, but it is the difference between a silky, self-basting braise and a dry, disappointing meal.
Ask the butcher to cut the roast to between 3 and 4 pounds (1.36 to 1.8 kg). Anything significantly smaller risks overcooking the outer layers while waiting for the center to become tender. Anything much larger will require extended cooking times that can push the vegetables into mush.
For the carrots, choose large, firm specimens—ideally thick enough to cut into chunky 2-inch (5 cm) pieces. Thin carrots will disintegrate by hour five. The same principle applies to potatoes: seek out small, waxy varieties like Yukon Gold that hold their shape through the eight-hour cook cycle. Starchy russets will turn into paste.
Fresh aromatics matter too. Pearl onions add delicate sweetness without overpowering the beef. Fresh rosemary and thyme (not dried) provide botanical complexity that lifts the gravy from simple to sophisticated.
Ingredients Table
| Category | Ingredient | Measurement |
|---|---|---|
| The Protein Core | Beef Chuck Roast, well-marbled center cut | 3 lbs / 1.36 kg |
| The Protein Core | Extra Virgin Olive Oil for searing | 2 tbsp / 30 ml |
| The Protein Core | Kosher Salt for seasoning | 2 tsp / 12g |
| The Protein Core | Freshly Ground Black Pepper | 1 tsp / 2.5g |
| The Aromatic Vegetable Foundation | Large Sweet Carrots, chunky cut | 1 lb / 454g |
| The Aromatic Vegetable Foundation | Small Waxy Potatoes (Yukon Gold), halved | 1.5 lbs / 680g |
| The Aromatic Vegetable Foundation | Pearl Onions or Yellow Onion, quartered | 8 oz / 227g |
| The Braising Liquid Matrix | Concentrated Beef Stock | 2 cups / 480 ml |
| The Braising Liquid Matrix | Worcestershire Sauce (dark umami depth) | 2 tbsp / 30 ml |
| The Braising Liquid Matrix | Garlic Powder (not fresh—prevents bitterness) | 1 tsp / 3g |
| The Braising Liquid Matrix | Dried Thyme Botanical Aromatics | 1 tsp / 1g |
| The Aromatic Vegetable Foundation | Fresh Rosemary Sprigs (for layering) | 3 sprigs / 6g |
| Gravy Enrichment | Unsalted Butter for roux | 3 tbsp / 43g |
| Gravy Enrichment | All-Purpose Flour for thickening suspension | 3 tbsp / 24g |
Common Kitchen Blunders That Destroy Pot Roast
| The Kitchen Blunder | What Actually Happens (Scientific Reality) | The Chef Joseph Fix |
|---|---|---|
| Using a lean cut like sirloin or tenderloin | Lean cuts lack the intramuscular fat and collagen needed for slow cooking. The meat dries out before any gelatin forms, leaving you with tough, flavorless fibers. | Always use chuck roast. The fat is not a flaw—it is the entire mechanism that makes slow cooking work. |
| Overloading the crockpot with liquid | Too much braising liquid dilutes the final gravy and prevents proper Maillard browning of the beef exterior. The meat steams instead of braises, resulting in pale, wan flavor. | Fill the crockpot until the liquid reaches only halfway up the beef. The meat will release its own moisture as it cooks. |
| Adding soft vegetables like zucchini at the start | Soft vegetables disintegrate into mush long before the beef is tender. You end up with vegetable soup and mushy solids floating around. | Add delicate vegetables in the final 45 minutes. Carrots and potatoes can go in from the start; soft vegetables join near the end. |
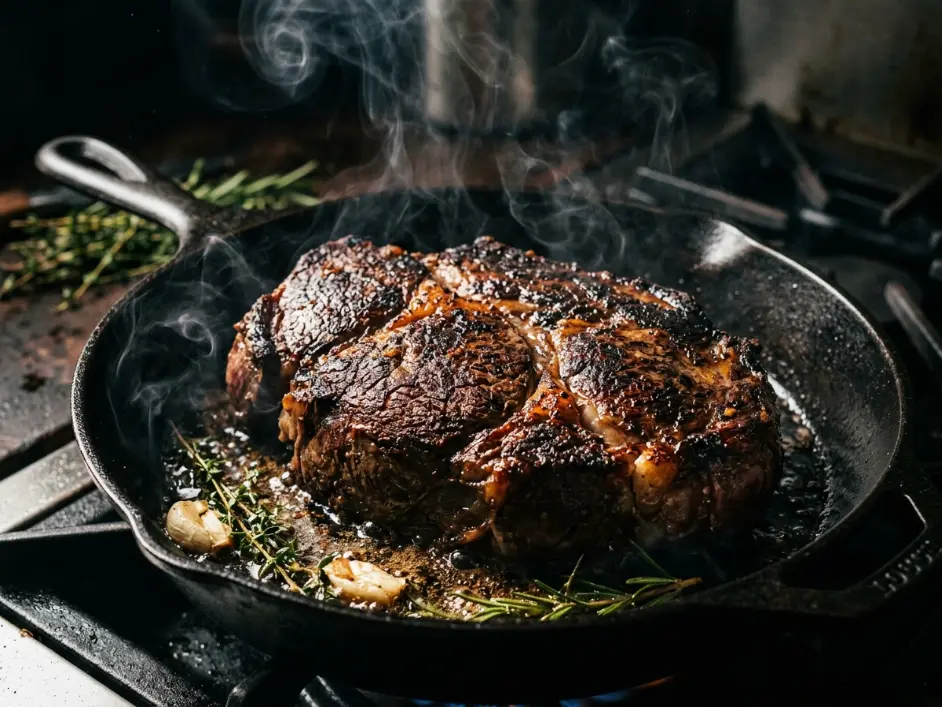
| Skipping the initial high-heat searing stage | Without searing, the beef never develops the Maillard crust—the brown, caramelized exterior that provides deep savory flavor. The final dish tastes flat and one-dimensional, like boiled meat. | Sear the beef on all four sides in a hot, oiled skillet for 3–4 minutes per side before adding it to the crockpot. This step is non-negotiable. |
| Constantly lifting the lid during cooking | Each time you lift the lid, you release trapped steam and drop the internal temperature by 10–15°F (5–8°C). This extends cooking time and disrupts the precise thermal environment needed for collagen conversion. | Resist the urge. Leave the lid sealed. Trust the process. Check only once, at the 7-hour mark, to ensure the beef is fork-tender. |
| Failing to reduce the braising liquid into proper gravy | If you skip the gravy-making step, you end up with thin, watery liquid that tastes like seasoned water. All the dissolved collagen and meat juices are wasted in a flat-tasting broth. | Always strain the cooking liquid into a saucepan, create a butter-flour roux, and thicken it over medium-high heat until glossy and coat-the-spoon thick. This concentrates the flavor exponentially. |
Step-by-Step Method
Step 1: Maillard Reaction and Starch Dusting
Remove your beef chuck roast from the refrigerator and let it sit at room temperature for 30 minutes. This ensures even browning across the entire surface. Pat it completely dry with paper towels—moisture is the enemy of browning.
Generously season all sides of the roast with kosher salt and freshly ground black pepper. Do not be timid. The salt penetrates into the muscle fibers during the resting period and enhances the beef’s natural savory depth.
Heat 2 tablespoons (30 ml) of extra virgin olive oil in a large, heavy-bottomed skillet over medium-high heat until it shimmers. When you hold your hand a few inches above the pan, you should feel intense heat radiating upward.
Place the beef into the hot skillet. Do not move it. Let it sear undisturbed for 3 to 4 minutes, allowing a deep mahogany crust to form. Flip and repeat on the other three sides. The goal is a browned exterior across all surfaces—this is the Maillard reaction, the chemical process that creates hundreds of complex savory flavor compounds.
Remove the beef from the skillet and set it aside on a clean plate.
Step 2: Crockpot Assembly and Fluid Dynamics
While the beef rests, combine 2 cups (480 ml) of concentrated beef stock, 2 tablespoons (30 ml) of Worcestershire sauce, and 1 teaspoon (3g) of garlic powder in a separate bowl and whisk until the garlic powder dissolves completely. Garlic powder works better than fresh garlic here because it distributes evenly and does not develop bitter compounds during the eight-hour cook cycle.
Pour this liquid into the bottom of your crockpot.
Place the seared beef directly into the crockpot, making sure to scrape in all the browned food particles stuck to the bottom of the skillet—add a splash of water to the skillet, swirl it around, and pour that liquid into the crockpot as well. These browned bits are pure flavor.
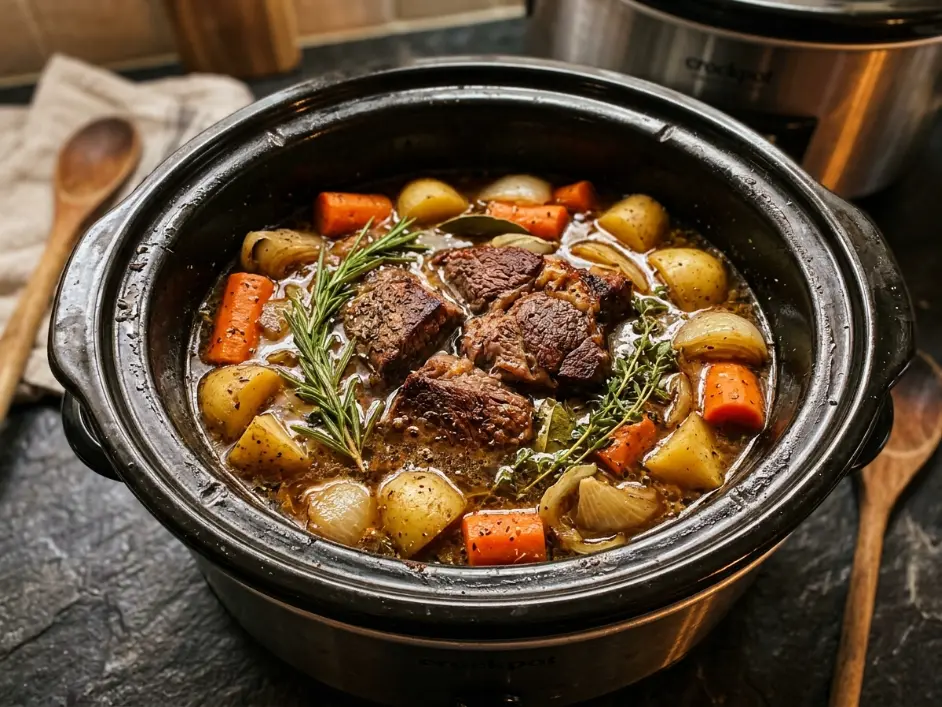
Nestle the chunky carrots, halved waxy potatoes, and pearl onions around the beef. Do not bury them; arrange them so they are partially submerged in the liquid. Tuck fresh rosemary sprigs and dried thyme into the liquid alongside the vegetables.
The liquid should reach approximately halfway up the beef. If it is higher, you have too much liquid. If it is lower, add a bit more stock.
Step 3: Optimal Thermal Cycles and Vegetable Timing
Cover the crockpot with the lid and set it to the Low setting. The Low setting on most crockpots maintains a temperature between 160°F and 180°F (71°C to 82°C)—precisely the range needed for optimal collagen-to-gelatin conversion without drying out the muscle fibers.
Cook undisturbed for 7 hours.
At the 7-hour mark, carefully remove the lid and test the beef with a fork. It should pull apart easily, offering virtually no resistance. If it still feels firm, add another 30 minutes to 1 hour of cooking time.
Do not add the softer vegetables at the beginning if you prefer them to retain texture. If you like your vegetables very soft, leave them in from the start. If you prefer them slightly firmer, add them during the final 45 minutes of cooking.
Step 4: Resting the Proteins and Gravy Synthesis
Once the beef reaches fork-tender status, carefully transfer it to a cutting board and tent it loosely with foil. Let it rest for 10 minutes—during this time, the muscle fibers relax and reabsorb their internal moisture, ensuring the final slices stay juicy.
Strain the cooking liquid from the crockpot into a medium saucepan, pressing gently on the vegetables to extract all their flavorful liquid. You should have approximately 2 to 2.5 cups (480 to 600 ml) of braising liquid.
Set the saucepan over medium-high heat and bring the liquid to a gentle simmer.
In a small bowl, whisk together 3 tablespoons (43g) of unsalted butter and 3 tablespoons (24g) of all-purpose flour until you have a smooth paste—this is your roux. The flour provides the starch that will trap water molecules and create a silky, glossy texture. The butter adds richness.
Slowly whisk the roux into the simmering braising liquid, stirring constantly to prevent lumps. Continue whisking for 2 to 3 minutes until the gravy thickens and coats the back of a spoon. It should have the consistency of heavy cream, not pancake batter.
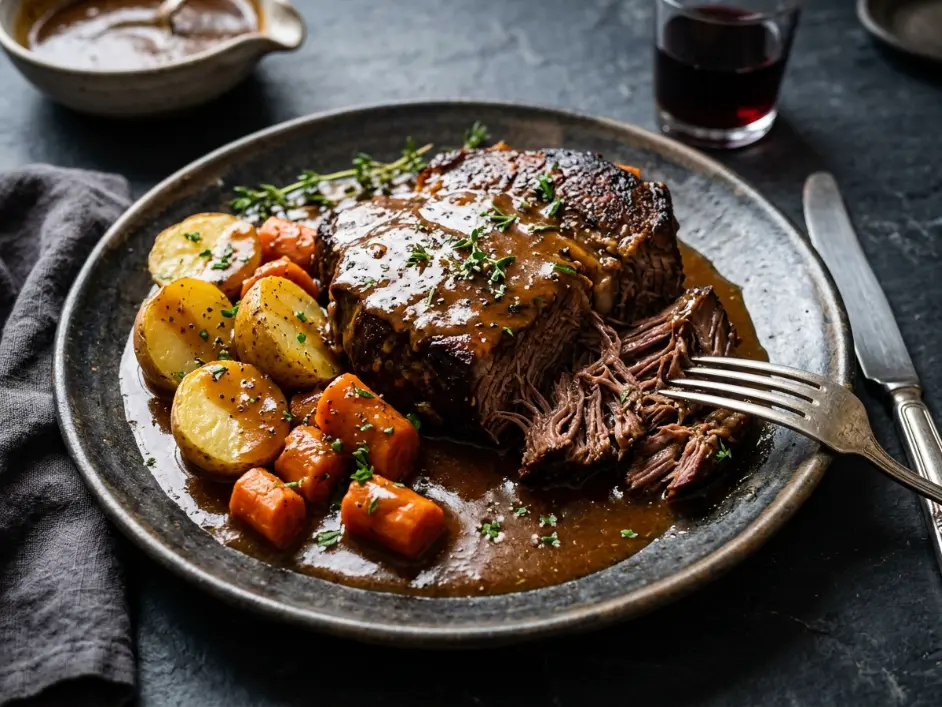
Taste the gravy and adjust seasoning with additional salt and pepper if needed. Pour it over the rested beef and vegetables, and serve immediately.
The entire dish, from start to finish, is a study in patience rewarded. Each scientific principle—the Maillard reaction, collagen hydrolysis, precise thermal control, and gravy emulsification—works in concert to create something far greater than the sum of its parts.
Chef Joseph’s Insight
Cooking is not just chemistry—it is memory made edible. When others gather around a table and tear off that first piece of warm, crunchy bread to plunge it into a bubbling, velvety center, the science fades away and pure connection takes over. The most powerful moves in the kitchen are almost always the quiet ones. The overnight rest. The proper preheat. The two-minute wait before you plate. It is the patience to wring out every last drop of moisture from your vegetables, and the care you take in picking the right cut of beef. Take your time, respect the process, and your kitchen will always reward you. Comfort food is not about shortcuts—it is about showing up. — Chef Joseph | Expert Palate
6 Masterclass Thermodynamic Rules for Majestic Cava Honey Harissa Chicken Bowls
Nutrition Information
Per serving (1/6 of recipe):
| Nutrient | Amount |
|---|---|
| Calories | 545 kcal |
| Protein | 52g |
| Total Fat | 28g |
| Saturated Fat | 11g |
| Carbohydrates | 18g |
| Dietary Fiber | 3g |
| Sodium | 720mg |
| Cholesterol | 145mg |
Note: These values are careful kitchen estimates based on standard USDA ingredient databases. Actual nutrition will vary based on specific brand selections and cooking method variables.
Food Safety and Thermal Management
Slow-cooked beef must reach a safe internal temperature to eliminate harmful bacteria. The USDA recommends that all beef products reach a minimum internal temperature of 145°F (63°C) for medium-rare doneness and 160°F (71°C) for medium.
Your crockpot on the Low setting naturally maintains temperatures well above this threshold throughout the entire cooking cycle, so food safety is rarely an issue with properly operating equipment.
The critical window is after cooking. Cooked beef must never linger in the danger zone—the temperature range between 40°F and 140°F (4°C to 60°C)—for more than 2 hours. In this temperature band, harmful bacteria multiply rapidly.
If you are making the pot roast for a dinner party and need to keep it warm for an extended period, maintain it at a temperature above 140°F (60°C) using a slow cooker set to the Warm setting or by keeping it covered in a 200°F (93°C) oven.
For detailed food safety guidelines and hot-holding protocols for larger gatherings, the Food Network and official USDA resources provide comprehensive guidance on safe food handling practices.
Storage and Reheating Matrix
| Item | Refrigerator Storage | Freezer Storage | Best Reheating Method |
|---|---|---|---|
| Fully Cooked Beef Pot Roast in Gravy | 3–4 days in an airtight container | Up to 3 months (properly wrapped) | Slow oven at 325°F (163°C) for 20–30 minutes, covered. This gentle heat prevents the meat from toughening while the gravy rehydrates. |
| Leftover Carrots and Potatoes (in gravy) | 3–4 days | Up to 3 months | Reheat together with the beef. The gravy protects them from drying out. |
| Leftover Carrots and Potatoes (without gravy) | 3–4 days | Up to 3 months | Microwave in short 30-second bursts with a splash of water, or reheat gently in a covered skillet over low heat with a tablespoon of butter. |
Never thaw frozen pot roast on the counter at room temperature. Thaw it overnight in the refrigerator, then reheat using the methods above.
Ultra-Tender Crockpot Beef Pot Roast with Carrots
Ingredients
Equipment
Method
- Step 1: Room Temperature Resting and Dry-Patting Protocol
- Remove your beef chuck roast from the refrigerator and allow it to sit at room temperature for a full 30 minutes before cooking. This critical resting period ensures even browning across the entire surface of the meat. Use paper towels to pat the beef completely dry—moisture is the enemy of proper Maillard browning and will create steam rather than a caramelized crust.
- Step 2: Salt and Pepper Seasoning Application
- Generously season all exposed sides of the beef chuck roast with kosher salt and freshly ground black pepper. Do not be timid with the seasoning—salt penetrates the muscle fibers during the resting period and enhances the beef’s natural savory depth through osmotic pressure and flavor amplification at the cellular level.
- Step 3: Skillet Preheating and Oil Temperature Control
- Heat 2 tablespoons (30 ml) of extra virgin olive oil in a large, heavy-bottomed stainless steel skillet over medium-high heat until the surface shimmers. When you hold your hand a few inches above the pan surface, you should feel intense radiant heat. The skillet temperature should reach approximately 400°F (204°C) for optimal Maillard crust formation.
- Step 4: Primary Maillard Searing Phase (First Side)
- Place the seasoned beef into the preheated hot skillet. Do not move it or attempt to flip it prematurely. Allow the meat to sear undisturbed for 3 to 4 minutes, permitting a deep mahogany brown crust to develop across the first surface. This immobile contact with the hot pan is what triggers the Maillard reaction—the chemical process that creates hundreds of complex savory flavor compounds through the reaction of amino acids and reducing sugars.
- Step 5: Sequential Searing of Remaining Three Sides
- Using kitchen tongs or a sturdy spatula, flip the beef and repeat the undisturbed searing process on each of the remaining three sides, allocating 3 to 4 minutes per surface. The goal is a uniformly browned exterior across all four major faces of the roast. Once all sides are properly seared, transfer the beef to a clean plate and set aside.
- Step 6: Braising Liquid Preparation and Emulsification
- While the beef rests, combine 2 cups (480 ml) of concentrated beef stock, 2 tablespoons (30 ml) of Worcestershire sauce, and 1 teaspoon (3g) of garlic powder in a separate mixing bowl. Whisk these ingredients together until the garlic powder dissolves completely into the liquid. Garlic powder works superior to fresh garlic in slow-cooking applications because it distributes evenly throughout the braising liquid and does not develop bitter or sulfurous compounds during the extended eight-hour cook cycle.
- Step 7: Crockpot Base Liquid Assembly
- Pour the prepared braising liquid mixture into the bottom of your 6-quart slow cooker vessel. This liquid base will create the environment for perfect collagen hydrolysis and gelatin formation during the slow-cooking process.
- Step 8: Seared Beef Placement and Fond Incorporation
- Place the seared beef chuck roast directly into the crockpot on top of the braising liquid. Using a wooden spoon or heat-resistant spatula, scrape the bottom of the hot skillet to collect all the browned food particles (technically called “fond”)—these caramelized bits are concentrated repositories of savory flavor compounds and represent the captured essence of the Maillard reaction. Deglaze the skillet by adding a small splash of water (approximately 1/4 cup / 60 ml), swirl it around to dissolve the fond, and pour this flavorful liquid directly into the crockpot.
- Step 9: Vegetable Arrangement and Spatial Distribution
- Nestle the chunky-cut carrots, halved waxy potatoes, and quartered pearl onions around the seared beef within the crockpot. Arrange them so they are partially submerged in the braising liquid but not buried completely. Proper spatial arrangement allows the vegetables to cook evenly and absorb the flavor-rich liquid while maintaining structural integrity throughout the cooking cycle.
- Step 10: Aromatic Herb Integration
- Tuck fresh rosemary sprigs and dried thyme botanicals into the braising liquid alongside the vegetables and beef. These aromatics will infuse their volatile compounds into the liquid and create complexity and depth in the final gravy. Distribute them throughout the liquid rather than clustering them in one location.
- Step 11: Liquid Level Verification
- Verify that the braising liquid reaches approximately halfway up the height of the beef chuck roast. If the liquid level exceeds three-quarters of the roast’s height, you have too much liquid, which will dilute the final gravy flavor and prevent proper browning concentration. If the liquid falls below one-third of the roast’s height, add additional beef stock in small increments until proper level is achieved. The beef will release its own moisture during cooking, so you do not need to completely submerge it.
- Step 12: Crockpot Seal and Thermal Setting
- Cover the crockpot with its lid and set the temperature control to the Low setting. The Low setting on most standard crockpots maintains an internal temperature between 160°F and 180°F (71°C to 82°C)—precisely the temperature range required for optimal collagen-to-gelatin conversion without accelerated myofibrillar protein contraction that causes dryness.
- Step 13: Extended Uninterrupted Cooking Cycle
- Allow the crockpot to cook undisturbed for 7 hours without lifting the lid. Each time the lid is lifted, the internal temperature drops 10–15°F (5–8°C), which extends the overall cooking time and disrupts the precise thermal environment needed for complete collagen hydrolysis. Resist the urge to check on the meal until the 7-hour mark.
- Step 14: Tenderness Assessment and Doneness Testing
- At precisely the 7-hour cooking mark, carefully remove the crockpot lid and test the beef’s tenderness using a fork. Insert the fork into the thickest part of the roast and attempt to pull apart a piece of meat. The beef should separate with virtually no resistance, practically melting apart at the gentlest pressure. If the meat still feels firm or requires significant pressure to tear, add another 30 minutes to 1 hour of cooking time to the cycle.
- Step 15: Vegetable Texture Preferences and Timing Adjustment
- If you prefer vegetables with slightly firmer texture and more structural integrity, add them during the final 45 minutes of the cooking cycle rather than at the beginning. If you prefer very soft, yielding vegetables that have absorbed maximum gravy and lost some structural firmness, you can add them from the start alongside the beef, accepting that they will be quite tender by the completion of cooking.
- Step 16: Beef Resting Protocol and Carryover Cooking
- Once the beef reaches complete fork-tender status, carefully transfer it to a large wooden cutting board using sturdy kitchen tongs. Tent it loosely with aluminum foil to retain warmth while allowing slight air circulation. Let the rested beef remain undisturbed for 10 minutes. During this crucial resting period, the muscle fibers relax after the intense heat exposure, and internal moisture redistributes throughout the meat structure, ensuring the final slices remain juicy and succulent rather than allowing moisture to pool on the cutting board.
- Step 17: Braising Liquid Straining and Vegetable Separation
- Carefully strain the cooking liquid from the crockpot into a medium saucepan, using a fine mesh strainer or slotted spoon. Press gently on the cooked vegetables with the back of a spoon to extract all their flavorful liquid and any dissolved collagen without crushing them into pulp. Reserve the strained vegetables in a separate container. You should yield approximately 2 to 2.5 cups (480 to 600 ml) of braising liquid for gravy synthesis.
- Step 18: Braising Liquid Reduction and Simmering
- Set the saucepan containing the strained braising liquid over medium-high heat and bring the liquid to a gentle simmer—small bubbles should break the surface continuously but not vigorously boil. Simmering concentrates flavors and begins the reduction process that will intensify the gravy’s savory depth.
- Step 19: Roux Preparation and Fat-Starch Emulsion
- In a small mixing bowl, combine 3 tablespoons (43g) of unsalted butter and 3 tablespoons (24g) of all-purpose flour. Whisk these ingredients together vigorously until you create a smooth paste with no visible flour lumps. This mixture is called a roux—the butter provides richness and acts as an emulsifier, while the flour provides starch granules that trap water molecules and create a silky, glossy texture in the final gravy.
- Step 20: Roux Integration and Gravy Thickening
- Slowly pour the prepared roux paste into the simmering braising liquid while whisking constantly and vigorously. The constant whisking motion prevents the flour from clumping and ensures even distribution throughout the liquid. Continue whisking for 2 to 3 minutes until the gravy visibly thickens and coats the back of a metal spoon with a glossy sheen. The gravy should reach a consistency similar to heavy cream—thick enough to coat food but still pourable.
- Step 21: Seasoning Adjustment and Final Flavor Calibration
- Taste the finished gravy using a clean spoon. Add additional kosher salt and freshly ground black pepper if needed to balance the savory depth. Remember that the beef and vegetables already contain salt from the braising process, so taste before aggressively adding more seasoning.
- Step 22: Plating and Immediate Service
- Slice or tear the rested beef chuck roast into large, rustic pieces or bite-sized chunks according to your preference. Arrange the sliced beef on a serving platter or individual dinner plates, surrounding each portion with the reserved cooked carrots, potatoes, and onions. Pour the finished mahogany-colored gravy generously over the beef and vegetables, allowing it to pool around each component. Serve immediately while the dish maintains optimal temperature and the gravy remains silky and fluid.
Notes
| Beef Selection | Use well-marbled chuck roast from butcher counter. Marbling is essential—do not trim fat. Center-cut, 3–4 lbs (1.36–1.8 kg) works best. |
| Room Temperature | Let beef sit 30 minutes before searing. Cold meat browns unevenly. |
| Searing is Non-Negotiable | High heat (400°F / 204°C) for 3–4 minutes per side. Creates Maillard crust—the flavor foundation. Skip this = flat-tasting pot roast. |
| Liquid Level | Fill crockpot to halfway up the beef. Too much liquid dilutes gravy. Too little risks drying vegetables. |
| Sealed Lid Discipline | Do NOT lift lid during cooking. Each lift drops temp 10–15°F (5–8°C). Check only at 7-hour mark. |
| Vegetable Timing | Add carrots/potatoes from start (they need 7–8 hours). Add soft veggies (zucchini, peppers) in final 45 minutes. |
| Fond Preservation | Scrape browned bits from searing pan. Deglaze with water. Pour into crockpot. This is pure flavor—do not discard. |
| Beef Resting | Rest 10 minutes after cooking, loosely tented with foil. Moisture redistributes throughout meat = juicy slices. |
| Gravy Thickening | Whisk roux (butter + flour) slowly into simmering liquid while constantly stirring. Prevents lumps. Should coat spoon like heavy cream. |
| Seasoning | Taste gravy after thickening. Adjust salt/pepper. Do not over-salt at start—reduces more concentrated. |
| Storage | Refrigerate 3–4 days. Freezes up to 3 months. Reheat in 325°F (163°C) oven covered for 20–30 minutes. |
| Crockpot Size | Use 6-quart. Smaller = overcrowding. Larger = vegetables dry out. |
| Low Setting Only | Never use High. Low (160–180°F / 71–82°C) gives tender meat. High (190–210°F / 88–99°C) dries it out. |
| Worcestershire Sauce | Non-optional. Adds umami depth. Do not skip. |
| Concentrated Stock | Use concentrated beef stock, not weak broth. Full flavor essential for gravy. |
| Make-Ahead | Sear beef and prep vegetables day before. Assemble crockpot morning of cooking. |
| Wine Pairing | Serve with Pinot Noir or Cabernet Sauvignon. Medium-bodied reds complement rich gravy perfectly. |
| Bread Essential | Crusty bread or rolls are mandatory for soaking gravy. This is the best part. |
| Food Safety | Gravy must reach rolling boil after flour addition. Store leftovers within 2 hours of cooking. Never thaw at room temperature. |
Frequently Asked Culinary Questions
Why does my pot roast taste flat and underseasoned?
You likely did not properly sear the beef before braising, which means you missed the Maillard crust that provides deep savory flavor. Additionally, you may have used too much braising liquid, which dilutes the final taste. The solution is twofold: always sear, and always reduce the braising liquid into a proper gravy. Never skip the gravy-making step.
Can I freeze the leftovers without ruining the carrots’ texture?
Yes, but expect them to be slightly softer when thawed. The freezing process breaks down cell walls, which affects texture. The gravy actually protects them from becoming mushy. When you reheat, do so gently over low heat or in a 325°F (163°C) oven, covered, for 20–30 minutes. The slow reheating helps the vegetables reabsorb moisture.
Why did the vegetables finish cooking hours before the beef?
Because you added them at the same time as the beef. Carrots and potatoes require only 5–6 hours to become tender, while beef chuck needs the full 7–8 hours for complete collagen conversion. If you prefer vegetables with more texture, add them during the final 45 minutes of cooking. If you prefer very soft vegetables, you can add them from the start, accepting that they will be quite tender.
Is searing the meat absolutely necessary?
Technically, no—the beef will become tender in the crockpot without searing. But the final flavor will be significantly compromised. Searing creates the Maillard crust, which provides hundreds of complex savory flavor compounds that cannot be replicated any other way. The extra 10 minutes of prep time is worth the exponential flavor improvement.
Can I cook this on High instead of Low to save time?
You can, but you will sacrifice texture and tenderness. The High setting on most crockpots reaches 190°F to 210°F (88°C to 99°C), which accelerates collagen conversion but also accelerates myofibrillar protein tightening. The result is faster cooking but less tender meat. Low and slow is genuinely the superior method. Patience is the secret ingredient.