5 Foolproof Culinary Tactics for Dreamy Creamy Shredded Chicken Tacos
The smell hits you before you even open the pan. That warm, toasted-cumin-and-chipotle aroma rising off a skillet packed with impossibly moist, slow-simmered pulled chicken cradled in a velvety cream sauce. Then you sink your teeth into that first warm, fire-kissed corn tortilla and the magic happens — the chicken doesn’t fall apart, the sauce doesn’t run down your wrist, and the flavors don’t separate into distinct, competing layers.
But here is what keeps going wrong in most home kitchens: the chicken turns chalky and dry within minutes. The cream sauce breaks into an ugly greasy layer that refuses to coat the meat. The tortilla gets soggy from liquid pooling at the bottom. It is the difference between a transcendent taco experience and another forgettable weeknight disappointment.
I have tested this method across dozens of batches in the Expert Palate test kitchen, adjusting one variable at a time to isolate exactly what makes the difference between a split, oily mess and a perfectly bound, velvety emulsion. What I discovered was not complicated — it was precise. And once you understand the science moving beneath the surface, creamy shredded chicken tacos become one of the most reliable, impressive dishes you can pull off at home.
The Chemistry of Protein Denaturation and Dairy Emulsion Stability
Here is where most people stumble. They understand that slow cooking makes chicken tender, but they do not understand why the meat can suddenly absorb and hold onto a creamy sauce instead of letting it slide off like water on waxed paper.
When chicken breast muscle fibers are exposed to sustained low heat around 160°F to 165°F (71°C to 74°C), the protein molecules unwind and bond in new configurations. The collagen that makes raw chicken tough converts into gelatin. The muscle fibers themselves become porous, like tiny sponges at the microscopic level. This is not just about texture — this is about creating a physical structure that wants to trap and hold moisture and fat particles.
In simple terms: hot chicken muscle becomes a vastly more receptive vehicle for binding with cream sauce than cold chicken ever could be.
But here is the second part that separates a stable, velvety emulsion from a broken, separated disaster. When you introduce room-temperature or cold dairy into a pan with hot chicken, the milk fats can curdle almost instantly. The proteins in cream cheese or crema denature from the thermal shock, and suddenly your sauce splits into oil and solids.
The fix requires understanding lipid suspension. Dairy fats need time and gentle heat to integrate smoothly with the proteins already present in the cooked chicken. If you whisk softened cream cheese into warm cream over medium-low heat while stirring constantly, the fat molecules gradually disperse throughout the liquid phase. The result is a stable colloidal suspension — a fancy way of saying the fat particles stay evenly distributed instead of clumping together.
Pulled Muscle Fiber Cavitation+Lactic Acid Emulsifiers+Controlled Heat→Stable Moisture-Locked Protein Matrix
Think of it like this: the chicken fibers act as microscopic sponges. The cream cheese and crema act as a binder that flows into all those tiny spaces. But the binder only flows smoothly if you introduce it slowly and gently. Rush the process or use too much heat, and the binder separates into oil and clumps instead of creating a seamless coating.
Sourcing the Right Ingredients for Maximum Flavor and Stability
The quality of your final dish lives or dies based on what you bring home from the market.
Start with chicken. Do not grab whatever is on sale. Organic, air-chilled chicken breasts have a completely different texture profile than the standard commodity bird swimming in a pool of retained water. Air-chilled poultry loses excess surface moisture during processing, which means the muscle fibers are denser and more receptive to absorbing sauce. When you bite into air-chilled chicken, it has a cleaner, more delicate flavor because there is no invisible film of processing liquid masking the actual meat taste.
If your local grocery store stocks bird from brands like Organic Valley or Vital Farms, grab those. If you have access to a butcher counter or specialty market, even better. The few extra dollars are invisible next to the massive difference in final texture and flavor.
For the cream component, do not skimp. Full-fat brick cream cheese — the kind made by Philadelphia or specialty creameries — creates a radically different sauce matrix than reduced-fat versions. The higher fat content means more stability, less likelihood of curdling, and a velvety mouthfeel that cheap alternatives simply cannot match. Pair this with authentic Mexican crema from a Latin market if you can find it, or use full-fat sour cream from Straus Family Creamery if you want something locally sourced.
The tortillas matter more than most home cooks realize. Seek out stone-ground, nixtamalized corn tortillas from a local tortillería or brands like Maseca that specifically note they use traditional nixtamalization. These tortillas have more structural integrity, a deeper corn flavor, and they hold up to heavy, saucy fillings without disintegrating.
Ingredients Table
| Category | Ingredient | Measurement |
|---|---|---|
| The Slow-Braised Chicken Foundation | Boneless, Skinless Chicken Breasts | 2 lbs / 907g |
| Low-Sodium Chicken Broth | 3 cups / 720ml | |
| Sea Salt | 1 tsp / 6g | |
| Black Pepper | ½ tsp / 1g | |
| The Velvety Spiced Cream Matrix | Full-Fat Brick Cream Cheese, Softened | 8 oz / 226g |
| Mexican Crema or Full-Fat Sour Cream | ¾ cup / 180ml | |
| Canned Chipotle Peppers in Adobo Sauce | 2–3 peppers / 15g | |
| Ground Cumin | 2 tsp / 5g | |
| Smoked Chili Powder | 1 tsp / 3g | |
| Garlic Powder | ¾ tsp / 2g | |
| Onion Powder | ½ tsp / 1.5g | |
| Fresh Lime Juice | 2 tbsp / 30ml | |
| The Shell and Garnish Overlays | Stone-Ground Corn Tortillas | 12 tortillas / 360g |
| Fresh Cilantro Leaves, Minced | ¼ cup / 10g | |
| Purple Radishes, Thinly Sliced | 4 radishes / 80g | |
| Lime Wedges | 2 limes / 100g |
Common Kitchen Blunders That Destroy Creamy Shredded Chicken Tacos
| The Kitchen Blunder | What Actually Happens (Scientific Reality) | The Chef Joseph Fix |
|---|---|---|
| Boiling the chicken at a rolling boil | High, turbulent heat causes the muscle fibers to contract violently and squeeze out internal moisture. The proteins denature too aggressively, creating a dense, rubbery texture that refuses to accept any sauce. | Maintain a gentle simmer at 190°F to 200°F (88°C to 93°C). Poach the chicken, do not boil it. The low heat allows collagen to convert smoothly into gelatin while the muscle fibers remain porous and receptive. |
| Adding cold dairy directly into a bubbling hot pan | The thermal shock causes milk proteins and fats to denature instantly. The fats separate from the aqueous phase, creating visible grease pools floating on top of chunky solids. The emulsion breaks before it ever forms. | Soften your cream cheese to room temperature before adding it. Whisk it into warm (not hot) cream over medium-low heat, stirring constantly. Introduce it slowly, giving the fats time to disperse evenly throughout the liquid. |
| Skipping the tortilla charring step | Cold or lukewarm tortillas lack structural integrity. When they absorb moisture from the warm, creamy filling, they become limp and prone to tearing or splitting open when you try to fold or roll them. | Warm each tortilla on a dry cast iron skillet over medium-high heat until dark blistered spots appear on both sides. This gentle toasting firms the corn starch structure and creates a barrier that resists moisture penetration. |
| Over-shredding the chicken into a mushy paste | Excessive shredding breaks down the muscle fiber structure too much. The fibers lose their ability to hold shape and absorb sauce evenly. You end up with a gummy, homogeneous mush instead of distinct, tender strands. | Use two dinner forks to separate the chicken into long, elegant strands. Shred with intention, pulling the forks apart gently rather than aggressively raking them through the meat. Larger strands hold sauce better and have superior texture. |
| Neglecting to drain excess cooking broth before introducing the fats | If you fold wet, broth-soaked chicken directly into the cream sauce, you dilute the dairy fats and create a thin, watery emulsion instead of a velvety coating. The excess liquid also makes the tortillas soggy. | After shredding the chicken, set it aside in a fine-mesh strainer for 2–3 minutes to drain any lingering cooking liquid. This step is invisible but essential. Drier chicken allows the cream sauce to coat evenly without dilution. |
| Omitting lime juice from the cream sauce | Heavy, rich dairy fats coat the palate and create a dull, one-dimensional flavor profile. Without brightness, the taco filling tastes flat and monotonous despite being technically well-made. | Finish your cream sauce with 2 tablespoons of fresh lime juice and a pinch of sea salt. The citric acid cuts through the fat, brightens the chipotle spice, and creates a balanced flavor that keeps your palate engaged bite after bite. |
Step-by-Step Method
Step 1: The Low-Thermal Poaching and Hydration Cycle
Place your two pounds of boneless, skinless chicken breasts into a deep skillet or Dutch oven. Pour in three cups of low-sodium chicken broth until the chicken is completely submerged. Add a teaspoon of sea salt and half a teaspoon of black pepper.
Bring the liquid to a gentle simmer over medium heat — you want small, lazy bubbles breaking the surface, not a rolling boil. Once it reaches a simmer, reduce the heat to medium-low and maintain that steady, peaceful bubbling for exactly fifteen minutes.
At the fifteen-minute mark, insert a meat thermometer into the thickest part of the largest breast. You are looking for 165°F (74°C). This is the precise temperature where poultry becomes fully cooked and safe, but the muscle fibers have not yet begun to tighten excessively or expel their moisture. Do not overcook this step. One extra minute at too-high a temperature can shift the texture from tender to chalky.
Remove the pan from heat and let the chicken rest in the warm broth for three minutes. This resting period allows the carryover heat to finish the cooking process gently without additional external thermal input. The muscle fibers relax slightly, which paradoxically helps them retain more moisture.
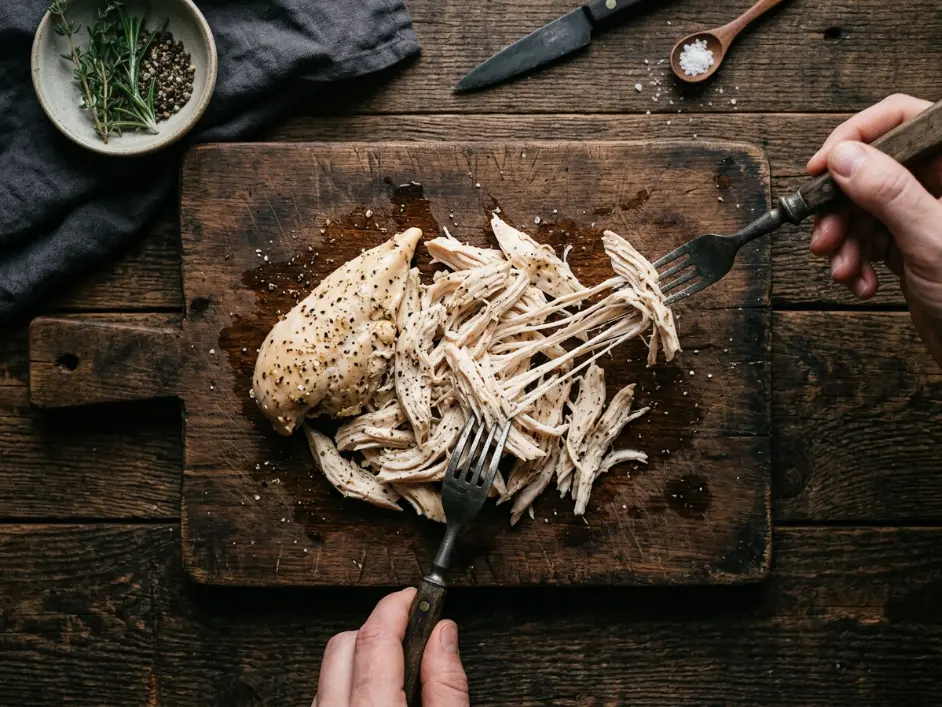
Step 2: Precision Fiber Separation Mechanics
Transfer the cooked chicken breasts onto a clean cutting board using tongs. Allow them to cool just enough that you can handle them comfortably — still warm, but not scalding.
Take two sturdy dinner forks and position them on opposite sides of a chicken breast. Pull the forks apart slowly and deliberately, splitting the muscle fibers along their natural grain. You should hear a subtle tearing sound as the collagen breaks apart. Work methodically, creating long, elegant strands rather than tiny, chaotic pieces.
The size of your shreds matters more than most recipes acknowledge. Smaller pieces absorb sauce more aggressively but lack textural integrity. Larger strands maintain their shape, deliver a satisfying chew, and distribute the creamy coating more evenly with each bite. Aim for strands roughly the size of a pencil — substantial enough to maintain structure, delicate enough to be tender.
Once all the chicken is shredded, transfer it into a fine-mesh strainer set over a bowl. Let gravity drain any excess cooking liquid for two to three minutes. This step is critical and often skipped. Excess broth will dilute your cream sauce and create a watery filling that makes your tortillas soggy.
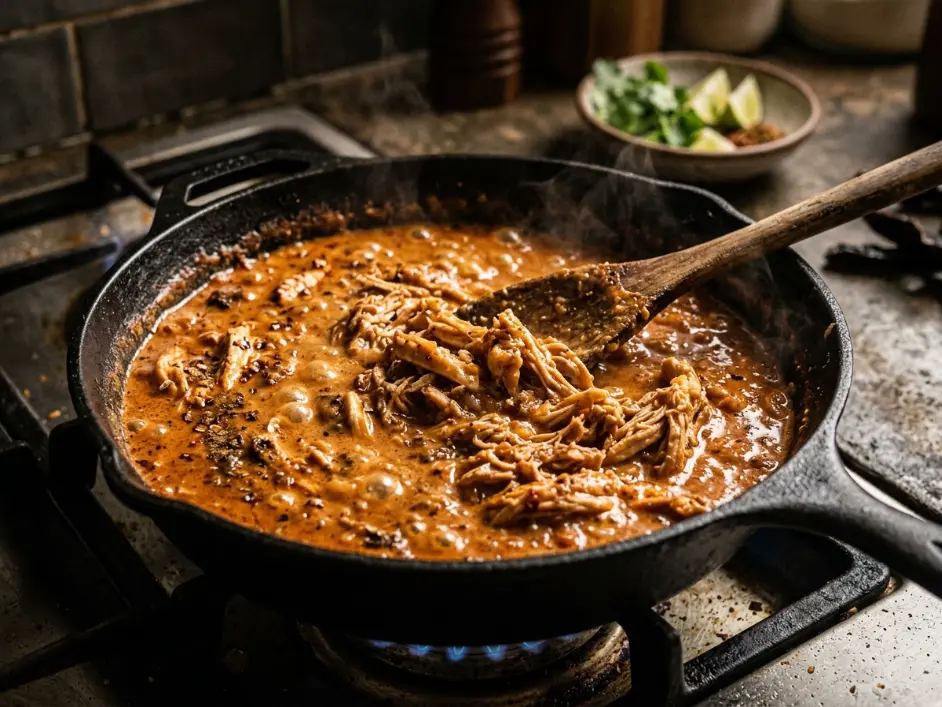
Step 3: Emulsifying the Spiced Cream Matrix
While the chicken drains, place a medium skillet over low heat. Add your softened cream cheese — it should be at room temperature, not cold — directly to the dry pan.
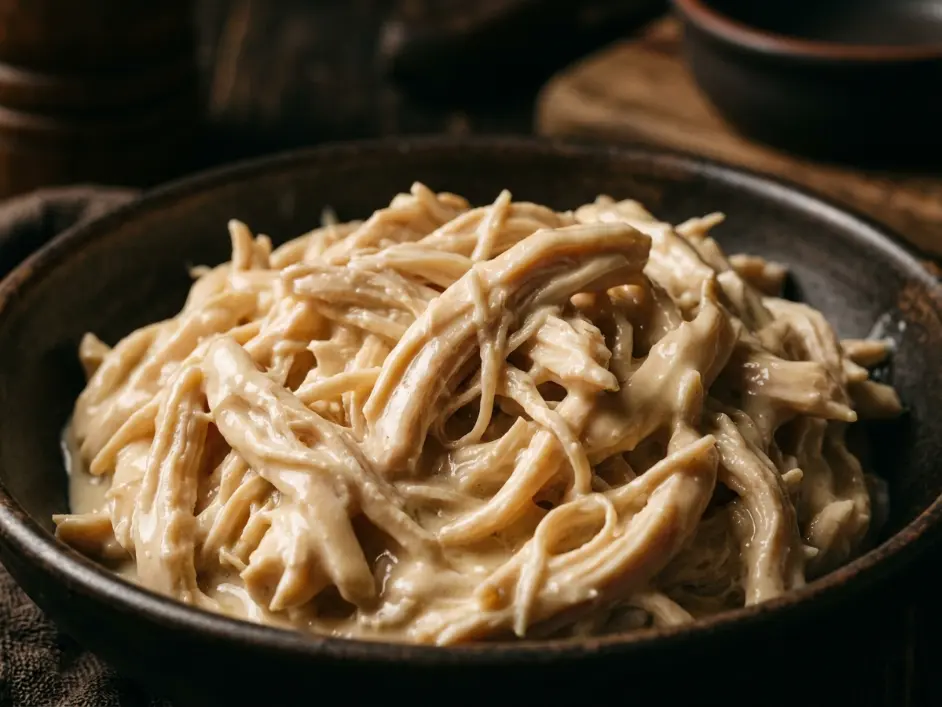
Wait fifteen to twenty seconds, then slowly pour in three-quarters of a cup of Mexican crema or full-fat sour cream while whisking constantly. The key word is slowly. You are not making a smoothie; you are coaxing two separate fats to merge into a unified emulsion. The whisking action breaks the cream cheese into smaller and smaller particles while the cream provides the liquid vehicle to disperse those particles evenly.
Once the cream cheese and crema are fully integrated and smooth, add your chipotle peppers. For three peppers, mince them finely. Remove as many seeds as you prefer — seeds deliver more heat, while the pod delivers more smoky flavor. Stir them in thoroughly so the spice distributes evenly.
Now add your ground cumin, smoked chili powder, garlic powder, and onion powder. Stir continuously for about thirty seconds so each spice blooms in the warm dairy and releases its essential oils. You should smell the shift — a deeper, more complex aroma emerging from the simple dairy base.
Taste a tiny spoonful. The sauce should taste fully seasoned but not overwhelming. Add the fresh lime juice and a pinch of sea salt. The lime brightens everything immediately, cutting through the richness and adding a clean, citric note that makes your palate want another bite.
Keep this sauce on low heat — you never want to see aggressive bubbling. The goal is to maintain a temperature around 160°F to 170°F (71°C to 76°C). Too much heat will cause the fats to separate again.
Step 4: Tortilla Blistering and Final Assembly
While your cream sauce simmers, place a dry cast iron skillet or comal over medium-high heat. Let it preheat for two minutes until it is genuinely hot — your hand held six inches above the surface should feel intense radiant heat.
Lay a corn tortilla directly on the hot surface. After roughly forty-five seconds, you should see dark blistered spots beginning to form. Flip the tortilla and blister the other side for another thirty to forty-five seconds. You are not trying to crisp the tortilla; you are applying just enough heat to firm the corn starch structure, create a subtle toasted flavor, and establish a moisture barrier that resists the upcoming creamy filling.
Stack your warmed tortillas in a clean kitchen towel to keep them warm and pliable while you work through the remaining batch.
Now fold the drained shredded chicken into your cream sauce. Use a spatula to turn it gently, ensuring every strand gets coated evenly. Let it sit on low heat for exactly two minutes. This resting period allows the porous muscle fibers to absorb the creamy sauce while the fats set up slightly, creating a more stable filling that will not run all over your plate.
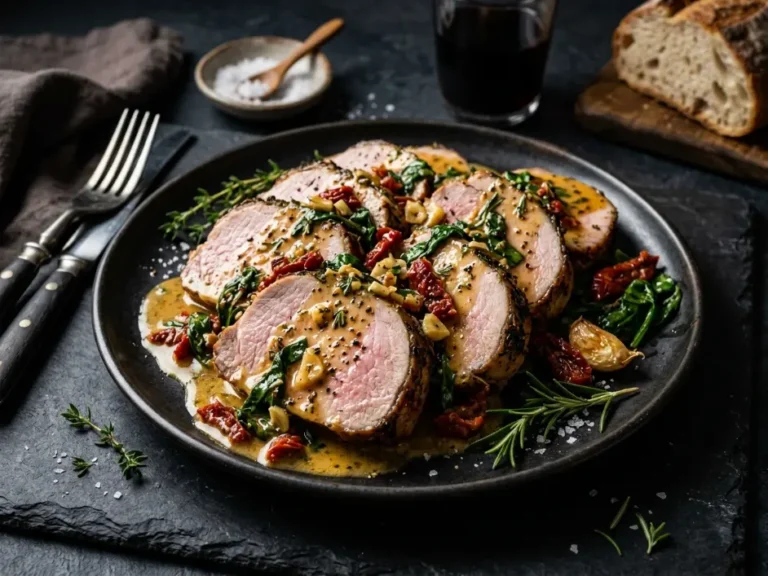
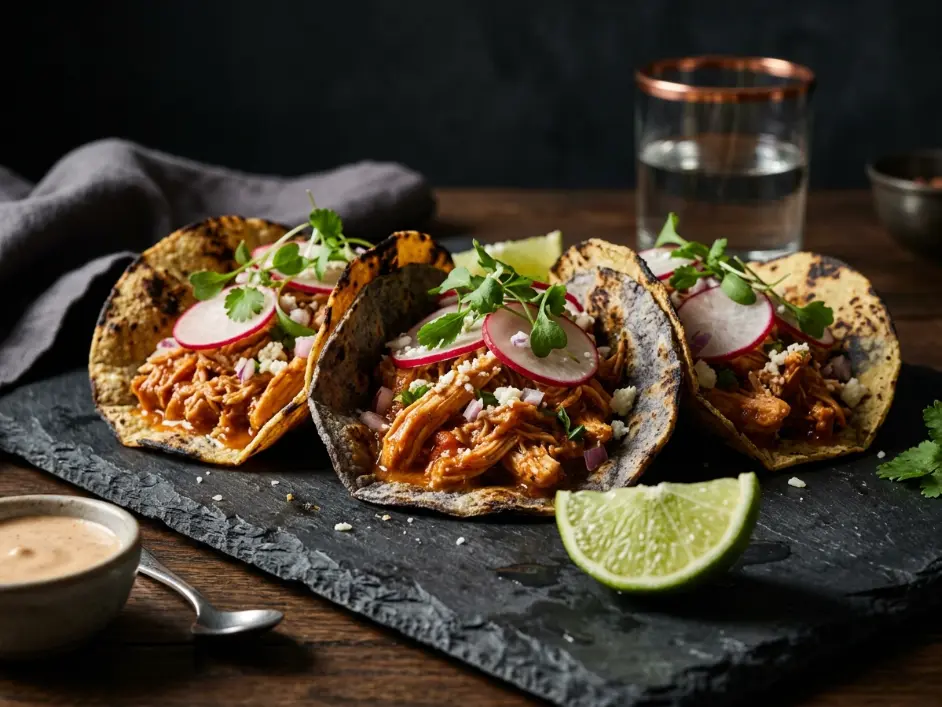
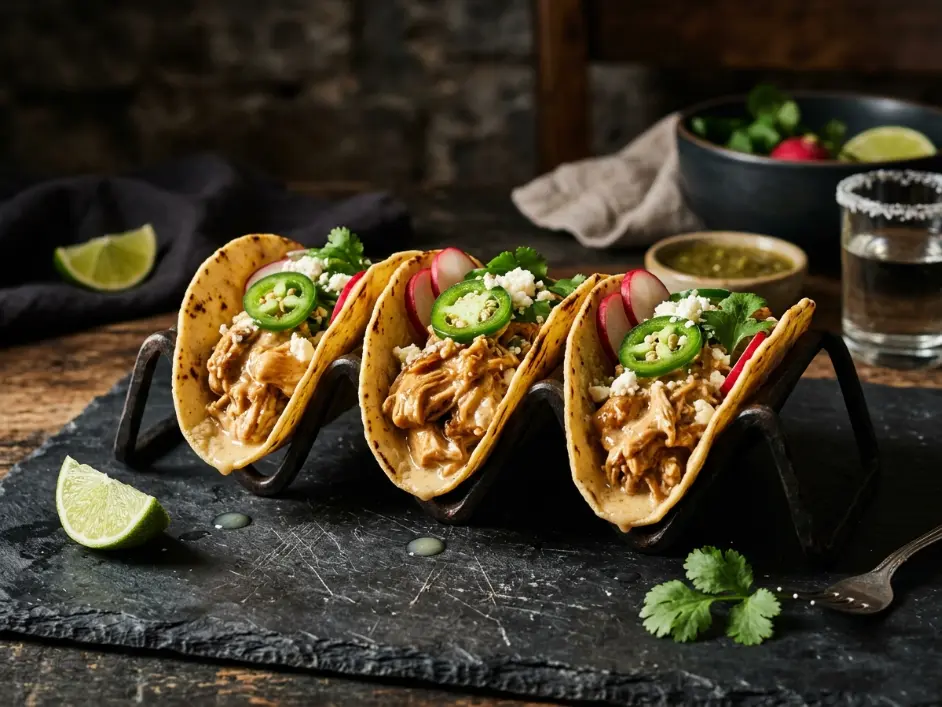
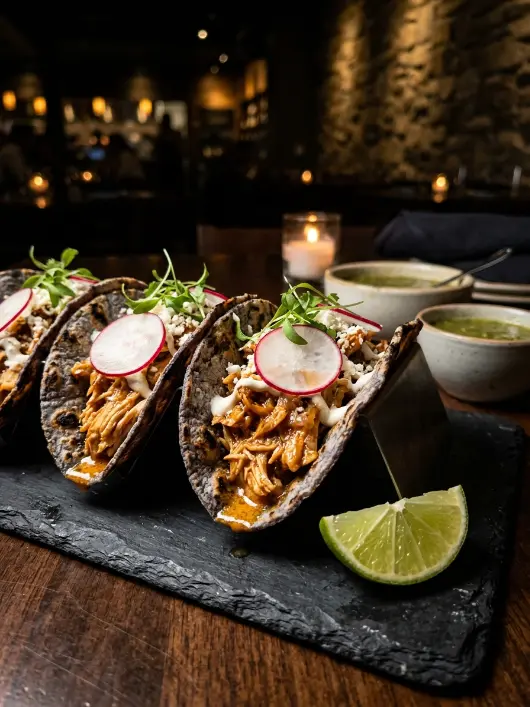
To assemble, place a warm tortilla on your work surface. Spoon three to four tablespoons of the creamy chicken filling into the center. Top with fresh minced cilantro and a few thin slices of purple radish for textural contrast and a peppery, slightly sweet flavor note.
Serve immediately alongside lime wedges. The brightness of fresh lime juice cut through the rich dairy fats and keeps the flavor profile balanced and crave-worthy.
Chef Joseph’s Insight
Cooking is not just chemistry — it is memory made edible. When others gather around a table and tear off that first piece of warm, crunchy bread to plunge it into a bubbling, velvety center, the science fades away and pure connection takes over. The most powerful moves in the kitchen are almost always the quiet ones. The overnight rest. The proper preheat. The two-minute wait before you plate. It is the patience to wring out every last drop of moisture from your greens, and the care you take in picking the right cheese. Take your time, respect the process, and your kitchen will always reward you. — Chef Joseph | Expert Palate
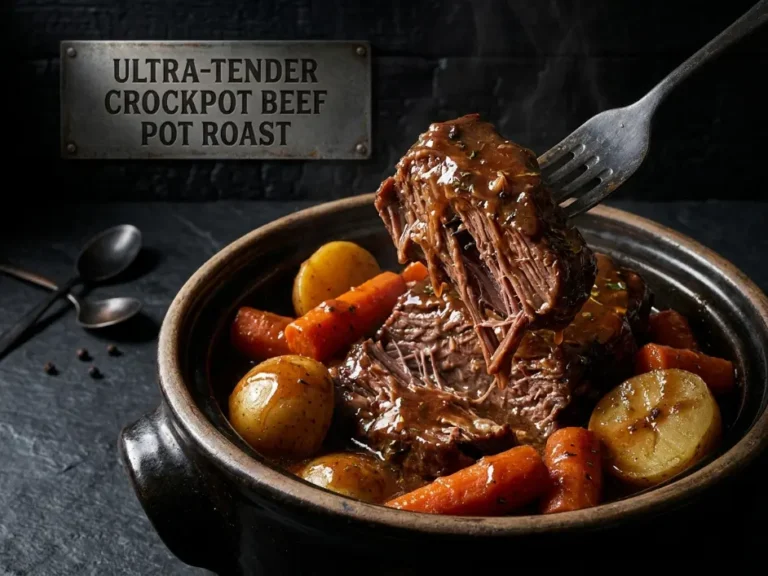
5 Flawless Molecular Rules for an Ultra-Tender Crockpot Beef Pot Roast with Carrots
Nutrition Information (Per Serving)
| Nutritional Component | Amount Per Serving |
|---|---|
| Calories | 485 |
| Protein | 52g |
| Total Fat | 24g |
| Saturated Fat | 11g |
| Carbohydrates | 18g |
| Dietary Fiber | 2g |
| Sodium | 620mg |
| Cholesterol | 135mg |
Note: Nutrition values are careful kitchen estimates based on standard USDA ingredient databases. Values assume four servings total and do not include optional lime wedges or additional toppings served on the side.
Food Safety and Thermal Management
Poultry safety is non-negotiable. It established a minimum internal temperature of 165°F (74°C) for fully cooked chicken, and this standard exists because it reliably eliminates pathogens like Salmonella and Campylobacter. Always use a calibrated meat thermometer inserted into the thickest part of the protein, away from bone.
The danger zone — the temperature range where bacteria multiply most aggressively — spans from 40°F to 140°F (4°C to 60°C). Creamy shredded chicken tacos should never sit at room temperature for longer than two hours. If you are assembling a taco buffet for a party, keep the creamy chicken filling in a slow cooker set on the low setting, maintaining a temperature above 140°F (60°C).
When storing cream cheese or crema, remember that these are perishable dairy products. Once opened, they have a shortened shelf life compared to their unopened counterparts. Store them in the coldest part of your refrigerator and use them within the timeframe printed on the package.
Storage and Reheating Guide
| Item State | Fridge Storage Limit | Freezer Option | Best Reheating Method |
|---|---|---|---|
| Creamy Shredded Chicken Filling (Separated) | 3–4 days | Up to 3 months (note: texture may change slightly) | Gentle stovetop reheating over low heat in a skillet with 2–3 tablespoons of milk, stirring constantly. Never microwave, as high heat shatters the emulsion. |
| Fully Assembled Tacos (Wrapped) | 1–2 days | Not recommended (tortillas become tough when frozen) | Wrap in foil and warm in a 325°F (163°C) oven for 8–10 minutes until heated through. Do not microwave, as this creates soggy, rubbery tortillas. |
| Raw or Cooked Chicken Breasts (Plain) | 3–4 days | Up to 4 months | Shred and incorporate into the warm cream sauce fresh rather than storing shredded. Raw chicken can be thawed in the refrigerator overnight or under cold running water for thirty minutes. |
Creamy Shredded Chicken Tacos
Ingredients
Equipment
Method
- Place the boneless, skinless chicken breasts into a deep skillet or Dutch oven. Pour in three cups of low-sodium chicken broth until the chicken is completely submerged. Add one teaspoon of sea salt and half a teaspoon of black pepper. Bring the liquid to a gentle simmer over medium heat — small, lazy bubbles breaking the surface, not a rolling boil. Once simmering, reduce heat to medium-low and maintain that steady bubbling for exactly fifteen minutes.
- At the fifteen-minute mark, insert a meat thermometer into the thickest part of the largest breast. You are looking for 165°F (74°C). Remove the pan from heat and let the chicken rest in the warm broth for three minutes. This resting period allows carryover heat to finish cooking gently without additional external thermal input.
- Transfer the cooked chicken breasts onto a clean cutting board using tongs. Allow them to cool just enough that you can handle them comfortably — still warm, but not scalding. Take two sturdy dinner forks and position them on opposite sides of a chicken breast. Pull the forks apart slowly and deliberately, splitting the muscle fibers along their natural grain. Work methodically, creating long, elegant strands rather than tiny, chaotic pieces.
- Once all the chicken is shredded, transfer it into a fine-mesh strainer set over a bowl. Let gravity drain any excess cooking liquid for two to three minutes. This step is critical and often skipped. Excess broth will dilute your cream sauce and create a watery filling.
- Place a medium skillet over low heat. Add your softened cream cheese — room temperature, not cold — directly to the dry pan. Wait fifteen to twenty seconds, then slowly pour in three-quarters of a cup of Mexican crema or full-fat sour cream while whisking constantly. The key word is slowly. You are not making a smoothie; you are coaxing two separate fats to merge into a unified emulsion.
- Once the cream cheese and crema are fully integrated and smooth, add your minced chipotle peppers. Remove seeds as you prefer — seeds deliver more heat, while the pod delivers more smoky flavor. Stir thoroughly so the spice distributes evenly. Add ground cumin, smoked chili powder, garlic powder, and onion powder. Stir continuously for about thirty seconds so each spice blooms in the warm dairy and releases its essential oils.
- Taste a tiny spoonful. The sauce should taste fully seasoned but not overwhelming. Add the fresh lime juice and a pinch of sea salt. The lime brightens everything immediately, cutting through the richness. Keep this sauce on low heat — never allow aggressive bubbling. The goal is to maintain a temperature around 160°F to 170°F (71°C to 76°C).
- While your cream sauce simmers, place a dry cast iron skillet or comal over medium-high heat. Let it preheat for two minutes. Lay a corn tortilla directly on the hot surface. After roughly forty-five seconds, you should see dark blistered spots beginning to form. Flip the tortilla and blister the other side for another thirty to forty-five seconds. Stack warmed tortillas in a clean kitchen towel to keep them warm and pliable.
- Fold the drained shredded chicken into your cream sauce. Use a spatula to turn it gently, ensuring every strand gets coated evenly. Let it sit on low heat for exactly two minutes. This resting period allows the porous muscle fibers to absorb the creamy sauce while the fats set up slightly, creating a more stable filling.
- To assemble, place a warm tortilla on your work surface. Spoon three to four tablespoons of the creamy chicken filling into the center. Top with fresh minced cilantro and a few thin slices of purple radish for textural contrast. Serve immediately alongside lime wedges. The brightness of fresh lime juice cuts through the rich dairy fats and keeps the flavor profile balanced and crave-worthy.
Notes
Frequently Asked Culinary Questions
Why did my cream sauce separate into a greasy layer after I mixed it with the chicken?
This happens when the temperature spikes too high or when cold dairy meets extremely hot chicken. The milk fats denature faster than they can disperse into the liquid phase, creating visible oil separation. The fix: maintain low-to-medium-low heat throughout, soften your cream cheese to room temperature before adding it, and introduce the dairy slowly while whisking constantly. If it has already separated, pour the mixture into a blender with a splash of fresh cream and blend on low speed for thirty seconds — the mechanical action can sometimes re-emulsify the sauce.
Can I use low-fat sour cream or Greek yogurt to cut down on the calories?
You can, but you will sacrifice both the flavor and the stability of your sauce. Low-fat dairy has fewer fat molecules to create the velvety mouthfeel you are after, and the higher protein content in Greek yogurt makes it prone to curdling when heated. If you want to reduce calories, use full-fat dairy but simply use slightly less of it — a quarter cup fewer ounces of cream cheese and crema will trim calories while maintaining the essential texture and flavor profile.
How do I keep my corn tortillas from splitting open when I roll or fold them?
The key is moisture and heat management. Warm your tortillas on a dry, hot skillet until they blister slightly — this firms the structure. Keep them stacked in a kitchen towel immediately after warming so they stay pliable but do not dry out. When you fill them, use a slightly drier filling (drain excess liquid!) so the tortilla is not absorbing constant moisture. If a tortilla splits despite your efforts, simply use it as a base for a taco salad instead — the filling and flavors are identical.
What can I do if my shredded chicken filling turns out too liquidy or runny?
First, check that you drained the excess cooking broth properly. If the filling is still too wet, return it to a skillet over low heat and let some of the liquid evaporate while stirring gently for five to eight minutes. The cream will become more concentrated and viscous. If that does not work, whisk together one tablespoon of cornstarch with two tablespoons of cold water, then drizzle it into the warm filling while stirring constantly. The cornstarch will thicken the sauce without adding flavor or greasiness.
Can I make this recipe ahead of time for meal prep?
The creamy chicken filling stores beautifully in the refrigerator for three to four days, making it ideal for meal prep. Store it separately from the tortillas in an airtight container. When you are ready to eat, reheat the filling gently over low heat in a skillet with a splash of milk, then warm your tortillas fresh and assemble. This workflow takes about five minutes and delivers far superior quality than cold tacos straight from the fridge.