Step 1: Room Temperature Resting and Dry-Patting Protocol
Remove your beef chuck roast from the refrigerator and allow it to sit at room temperature for a full 30 minutes before cooking. This critical resting period ensures even browning across the entire surface of the meat. Use paper towels to pat the beef completely dry—moisture is the enemy of proper Maillard browning and will create steam rather than a caramelized crust.
Step 2: Salt and Pepper Seasoning Application
Generously season all exposed sides of the beef chuck roast with kosher salt and freshly ground black pepper. Do not be timid with the seasoning—salt penetrates the muscle fibers during the resting period and enhances the beef's natural savory depth through osmotic pressure and flavor amplification at the cellular level.
Step 3: Skillet Preheating and Oil Temperature Control
Heat 2 tablespoons (30 ml) of extra virgin olive oil in a large, heavy-bottomed stainless steel skillet over medium-high heat until the surface shimmers. When you hold your hand a few inches above the pan surface, you should feel intense radiant heat. The skillet temperature should reach approximately 400°F (204°C) for optimal Maillard crust formation.
Step 4: Primary Maillard Searing Phase (First Side)
Place the seasoned beef into the preheated hot skillet. Do not move it or attempt to flip it prematurely. Allow the meat to sear undisturbed for 3 to 4 minutes, permitting a deep mahogany brown crust to develop across the first surface. This immobile contact with the hot pan is what triggers the Maillard reaction—the chemical process that creates hundreds of complex savory flavor compounds through the reaction of amino acids and reducing sugars.
Step 5: Sequential Searing of Remaining Three Sides
Using kitchen tongs or a sturdy spatula, flip the beef and repeat the undisturbed searing process on each of the remaining three sides, allocating 3 to 4 minutes per surface. The goal is a uniformly browned exterior across all four major faces of the roast. Once all sides are properly seared, transfer the beef to a clean plate and set aside.
Step 6: Braising Liquid Preparation and Emulsification
While the beef rests, combine 2 cups (480 ml) of concentrated beef stock, 2 tablespoons (30 ml) of Worcestershire sauce, and 1 teaspoon (3g) of garlic powder in a separate mixing bowl. Whisk these ingredients together until the garlic powder dissolves completely into the liquid. Garlic powder works superior to fresh garlic in slow-cooking applications because it distributes evenly throughout the braising liquid and does not develop bitter or sulfurous compounds during the extended eight-hour cook cycle.
Step 7: Crockpot Base Liquid Assembly
Pour the prepared braising liquid mixture into the bottom of your 6-quart slow cooker vessel. This liquid base will create the environment for perfect collagen hydrolysis and gelatin formation during the slow-cooking process.
Step 8: Seared Beef Placement and Fond Incorporation
Place the seared beef chuck roast directly into the crockpot on top of the braising liquid. Using a wooden spoon or heat-resistant spatula, scrape the bottom of the hot skillet to collect all the browned food particles (technically called "fond")—these caramelized bits are concentrated repositories of savory flavor compounds and represent the captured essence of the Maillard reaction. Deglaze the skillet by adding a small splash of water (approximately 1/4 cup / 60 ml), swirl it around to dissolve the fond, and pour this flavorful liquid directly into the crockpot.
Step 9: Vegetable Arrangement and Spatial Distribution
Nestle the chunky-cut carrots, halved waxy potatoes, and quartered pearl onions around the seared beef within the crockpot. Arrange them so they are partially submerged in the braising liquid but not buried completely. Proper spatial arrangement allows the vegetables to cook evenly and absorb the flavor-rich liquid while maintaining structural integrity throughout the cooking cycle.
Step 10: Aromatic Herb Integration
Tuck fresh rosemary sprigs and dried thyme botanicals into the braising liquid alongside the vegetables and beef. These aromatics will infuse their volatile compounds into the liquid and create complexity and depth in the final gravy. Distribute them throughout the liquid rather than clustering them in one location.
Step 11: Liquid Level Verification
Verify that the braising liquid reaches approximately halfway up the height of the beef chuck roast. If the liquid level exceeds three-quarters of the roast's height, you have too much liquid, which will dilute the final gravy flavor and prevent proper browning concentration. If the liquid falls below one-third of the roast's height, add additional beef stock in small increments until proper level is achieved. The beef will release its own moisture during cooking, so you do not need to completely submerge it.
Step 12: Crockpot Seal and Thermal Setting
Cover the crockpot with its lid and set the temperature control to the Low setting. The Low setting on most standard crockpots maintains an internal temperature between 160°F and 180°F (71°C to 82°C)—precisely the temperature range required for optimal collagen-to-gelatin conversion without accelerated myofibrillar protein contraction that causes dryness.
Step 13: Extended Uninterrupted Cooking Cycle
Allow the crockpot to cook undisturbed for 7 hours without lifting the lid. Each time the lid is lifted, the internal temperature drops 10–15°F (5–8°C), which extends the overall cooking time and disrupts the precise thermal environment needed for complete collagen hydrolysis. Resist the urge to check on the meal until the 7-hour mark.
Step 14: Tenderness Assessment and Doneness Testing
At precisely the 7-hour cooking mark, carefully remove the crockpot lid and test the beef's tenderness using a fork. Insert the fork into the thickest part of the roast and attempt to pull apart a piece of meat. The beef should separate with virtually no resistance, practically melting apart at the gentlest pressure. If the meat still feels firm or requires significant pressure to tear, add another 30 minutes to 1 hour of cooking time to the cycle.
Step 15: Vegetable Texture Preferences and Timing Adjustment
If you prefer vegetables with slightly firmer texture and more structural integrity, add them during the final 45 minutes of the cooking cycle rather than at the beginning. If you prefer very soft, yielding vegetables that have absorbed maximum gravy and lost some structural firmness, you can add them from the start alongside the beef, accepting that they will be quite tender by the completion of cooking.
Step 16: Beef Resting Protocol and Carryover Cooking
Once the beef reaches complete fork-tender status, carefully transfer it to a large wooden cutting board using sturdy kitchen tongs. Tent it loosely with aluminum foil to retain warmth while allowing slight air circulation. Let the rested beef remain undisturbed for 10 minutes. During this crucial resting period, the muscle fibers relax after the intense heat exposure, and internal moisture redistributes throughout the meat structure, ensuring the final slices remain juicy and succulent rather than allowing moisture to pool on the cutting board.
Step 17: Braising Liquid Straining and Vegetable Separation
Carefully strain the cooking liquid from the crockpot into a medium saucepan, using a fine mesh strainer or slotted spoon. Press gently on the cooked vegetables with the back of a spoon to extract all their flavorful liquid and any dissolved collagen without crushing them into pulp. Reserve the strained vegetables in a separate container. You should yield approximately 2 to 2.5 cups (480 to 600 ml) of braising liquid for gravy synthesis.
Step 18: Braising Liquid Reduction and Simmering
Set the saucepan containing the strained braising liquid over medium-high heat and bring the liquid to a gentle simmer—small bubbles should break the surface continuously but not vigorously boil. Simmering concentrates flavors and begins the reduction process that will intensify the gravy's savory depth.
Step 19: Roux Preparation and Fat-Starch Emulsion
In a small mixing bowl, combine 3 tablespoons (43g) of unsalted butter and 3 tablespoons (24g) of all-purpose flour. Whisk these ingredients together vigorously until you create a smooth paste with no visible flour lumps. This mixture is called a roux—the butter provides richness and acts as an emulsifier, while the flour provides starch granules that trap water molecules and create a silky, glossy texture in the final gravy.
Step 20: Roux Integration and Gravy Thickening
Slowly pour the prepared roux paste into the simmering braising liquid while whisking constantly and vigorously. The constant whisking motion prevents the flour from clumping and ensures even distribution throughout the liquid. Continue whisking for 2 to 3 minutes until the gravy visibly thickens and coats the back of a metal spoon with a glossy sheen. The gravy should reach a consistency similar to heavy cream—thick enough to coat food but still pourable.
Step 21: Seasoning Adjustment and Final Flavor Calibration
Taste the finished gravy using a clean spoon. Add additional kosher salt and freshly ground black pepper if needed to balance the savory depth. Remember that the beef and vegetables already contain salt from the braising process, so taste before aggressively adding more seasoning.
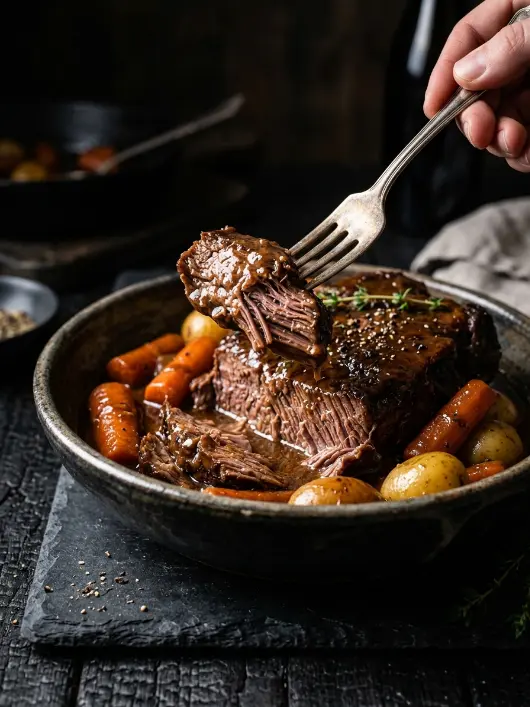
Step 22: Plating and Immediate Service
Slice or tear the rested beef chuck roast into large, rustic pieces or bite-sized chunks according to your preference. Arrange the sliced beef on a serving platter or individual dinner plates, surrounding each portion with the reserved cooked carrots, potatoes, and onions. Pour the finished mahogany-colored gravy generously over the beef and vegetables, allowing it to pool around each component. Serve immediately while the dish maintains optimal temperature and the gravy remains silky and fluid.