How to Master One-Pot Creamy Sun-Dried Tomato Chicken Breast in Just 25 Minutes
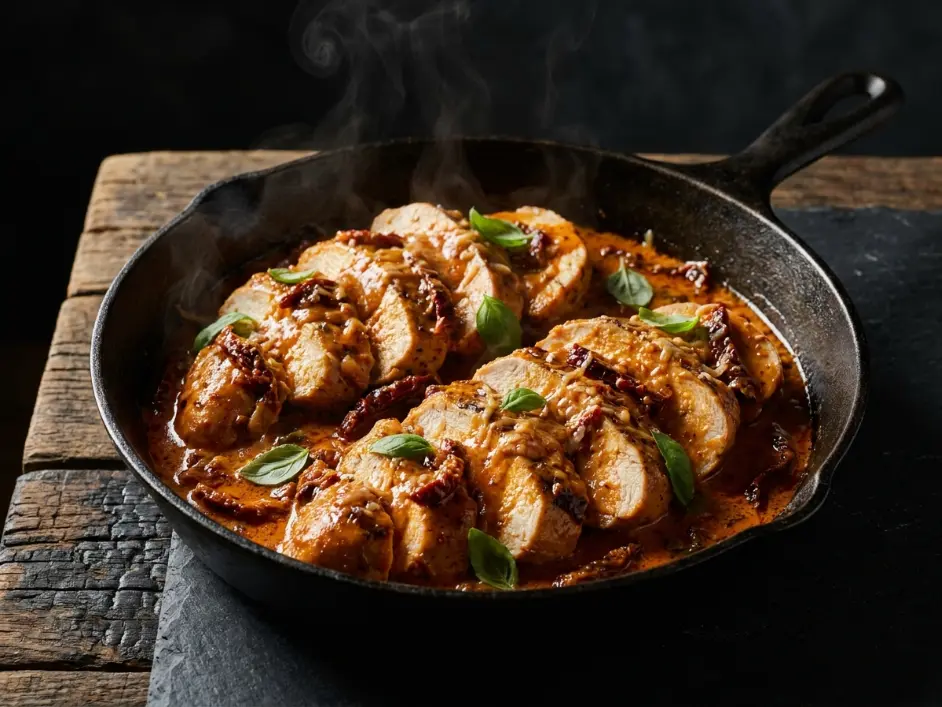
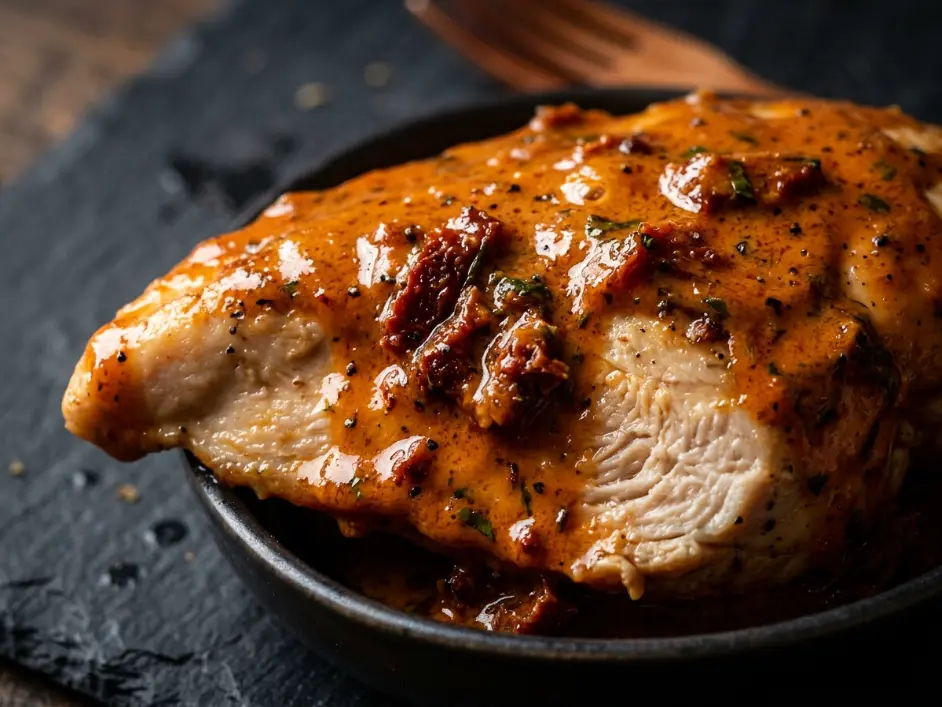
Imagine biting into a piece of chicken breast so succulent and tender it dissolves on your tongue, wrapped in a rich, velvety cream sauce infused with the deep umami of sun-dried tomatoes, fresh garlic aromatics, and a whisper of fresh basil. The sauce clings to every fiber, glossy and unified, never separated into greasy pools. The one-pot creamy sun-dried tomato chicken breast tastes like a restaurant-quality meal that somehow emerged from a single skillet in your home kitchen.
Now flip that script. The disastrous reality: a chalky, gray, overcooked chicken breast so dry it tastes like compressed cardboard, weeping colorless liquid across the plate. The cream sauce has separated into greasy, broken pools with watery liquid at the bottom. The sun-dried tomatoes taste tough and leathery. The whole dish tastes like a cooking failure instead of an elegant weeknight dinner.
I have tested this method across dozens of batches in the Expert Palate test kitchen, adjusting one variable at a time to isolate exactly what makes the difference between a split, oily mess and a perfectly bound, velvety emulsion. The one-pot creamy sun-dried tomato chicken breast requires understanding the precise relationships between myofibrillar protein denaturation thresholds, moisture retention mechanics, and lipid-emulsion stabilization physics.
This is where most home cooks catastrophically fail. They overcook the chicken. They add cold cream to boiling liquid and watch it separate. They burn the garlic. One misstep and your dinner becomes textually destroyed and flavor-compromised.
But master the thermal windows and emulsion science, and you’ll own an elegant weeknight meal that tastes like you spent hours perfecting technique instead of exactly twenty-five minutes in your kitchen.
The Molecular Science of Protein Denaturation and Emulsion Stabilization in One-Pot Cooking
Here’s the precise molecular reality happening inside your skillet during the cooking cycle. Chicken breast is approximately 65% water, 35% protein (predominantly myofibrillar proteins myosin and actin), and 5% fat. The entire dish depends on controlling protein denaturation timing and preventing moisture loss while simultaneously stabilizing a cream-based emulsion.
When heat enters the system, chicken breast myosin and actin proteins begin unraveling (denaturing) at around 140°F / 60°C. This protein restructuring is essential—it transforms raw translucent chicken into cooked opaque white. But here’s the critical trap: if you exceed 165°F / 74°C, the myofibrillar proteins denature completely and squeeze out their bound water molecules into the surrounding liquid as a pale, watery liquid.
In simple terms: Undercooked chicken tastes mushy and raw. Perfectly cooked chicken is succulent and tender with a silky, supple bite. Overcooked chicken is chalky, gray, and dry because all bound water has been expelled from the protein structure.
The thermal window for chicken breast is brutally narrow—you have roughly 8-10 minutes of cooking time between “perfect” and “rubbery” when cooking thin cutlets at moderate-to-high heat. This is why precision matters obsessively. You’re racing against a molecular clock that relentlessly tightens protein structures.
The sun-dried tomato component adds exceptional complexity. Sun-dried tomatoes are approximately 35% carbohydrates (mostly lycopene and fructose), 15% protein, and 5% lipids. The drying process concentrates their natural acids (citric acid and malic acid), making them intensely flavorful but also acidic. When you combine acidic sun-dried tomatoes with heavy cream, you’re creating a potentially destabilizing situation—acids denature the casein proteins in cream, potentially causing curdling.
The key to preventing curdling is temperature management and timing. If you add heavy cream to boiling liquid above 180°F / 82°C, the thermal shock causes the casein proteins to denature rapidly and precipitate out of suspension. You end up with separated, broken sauce pooling as grease at the bottom with cloudy, curdled cream solids floating on top.
But if you reduce heat to a gentle simmer (around 160-170°F / 71-77°C) before adding cold cream, the temperature gradient is less extreme. The cream’s water content evaporates slowly, and the milk solids (casein and whey proteins) integrate smoothly with the pan’s fat and acidic components, creating a unified emulsion instead of separation.
The garlic factor is equally critical. Fresh garlic contains allicin—a volatile sulfur compound with massive aromatic potential. When you heat garlic at moderate temperature (around 300-325°F / 149-163°C), allicin breaks down into smaller, mellower compounds that taste sweet and umami-rich. But if garlic exceeds about 350°F / 177°C, it burns and converts into bitter, acrid compounds that taste metallic and unpleasant.
The one-pot methodology adds another layer of complexity. You’re cooking everything in a single vessel, which means the liquid level, heat distribution, and evaporation rates must be carefully managed. If you start with too much liquid, the chicken steams instead of sears. If you start with too little, the sauce concentrates too quickly and proteins can overcook from the drying heat.
Myofibrillar Proteins+Controlled Thermal Curve+Lipid-Acid Emulsion→Succulent Velvety Chicken in One-Pot
Analyzing the raw structural properties, cellular lipid densities, and nutrient profiles of chicken breast scales accurately by checking verified biochemical datasets from the global FoodData Central database. Raw chicken breast typically contains approximately 1.4g fat per 100g and about 31g protein per 100g, with myosin isoforms that denature at precise thresholds around 140-165°F / 60-74°C depending on cooking method and presence of acids.
Pro Sourcing & Ingredient Selection
Start with chicken breast quality. Look for air-chilled chicken breast rather than water-chilled varieties. Air-chilled chicken has a higher surface-area-to-moisture ratio, meaning it browns better when seared and retains more moisture during cooking. The muscle fiber structure is also firmer and less waterlogged than water-processed chicken.
For chicken sizing, choose boneless, skinless breasts that are uniform in thickness—ideally 0.75 to 1 inch / 1.9 to 2.5cm thick. If you get thicker breasts, pound them gently to uniform thickness before cooking. Uniform thickness ensures even heat penetration and prevents thin areas from overcooking while thick areas remain undercooked.
For sun-dried tomatoes, seek oil-packed varieties from Mediterranean suppliers rather than dry-packed supermarket versions. Oil-packed tomatoes have retained more enzymatic activity and nuanced flavor. Their natural oils prevent them from becoming tough and leathery when rehydrated in the cream sauce. If using dry-packed, rehydrate them briefly in warm water before use.
For heavy cream, use only full-fat versions (36-40% butterfat minimum). Low-fat cream or half-and-half lacks the lipid density to stabilize properly against the acidic tomatoes. Premium European-style cream with higher butterfat content (40%+) creates a richer, more stable emulsion.
For garlic, use fresh whole cloves minced immediately before cooking—not pre-minced garlic from a jar. Fresh garlic has volatile sulfur compounds that are vibrant and aromatic. Pre-minced garlic has already begun oxidizing, losing aromatic potency and developing stale, sulfurous flavors.
For Parmigiano-Reggiano, seek aged 24-36 month wheels with visible crystalline structures throughout. The crystalline structures are calcium phosphate complexes that form during aging. These crystals add textural complexity and intense umami depth when melted into the sauce.
Comprehensive Ingredients Table
| Category | Ingredient | US Customary | Metric |
|---|---|---|---|
| Lean Poultry Base | Boneless, skinless chicken breast (air-chilled, uniform thickness) | 1.5 lbs | 680g |
| Umami Aromatics | Fresh garlic cloves (whole, minced just before cooking) | 4 cloves | 20g |
| Sun-dried tomatoes (oil-packed or briefly rehydrated) | 0.75 cup | 120g | |
| Fresh shallot (finely minced) | 1 small | 30g | |
| Lipidic Sauce Foundation | Heavy whipping cream (full-fat, 36-40% butterfat) | 1.5 cups | 360ml |
| Whole butter (unsalted, for pan searing) | 2 tbsp | 28g | |
| Low-sodium chicken stock (for deglazing) | 0.5 cup | 120ml | |
| Seasoning & Balance | Coarse sea salt | 1 tsp | 6g |
| Freshly cracked black pepper | 0.5 tsp | 1g | |
| Aged Parmigiano-Reggiano (freshly grated) | 0.75 cup | 75g | |
| Fresh lemon juice (freshly squeezed) | 1 tbsp | 15ml | |
| Fresh basil leaves (finely sliced, for garnish) | 0.25 cup | 12g | |
| Fresh thyme sprigs (herbaceous aromatics) | 4 sprigs | 6g |
Common Kitchen Blunders Matrix
| The Kitchen Blunder | What Actually Happens (Scientific Reality) | The Chef Joseph Fix |
|---|---|---|
| Overcooking the chicken breast beyond 165°F / 74°C | Myosin and actin proteins denature completely and contract excessively, squeezing out all bound intracellular water into the pan. The chicken becomes dense, chalky, and gray—the texture transforms from tender to rubber. The chicken also loses flavor compounds because the water molecules that carry taste sensations have been expelled from the protein structure. | Cook the chicken to exactly 165°F / 74°C internal temperature and remove immediately. Use an instant-read thermometer inserted into the thickest part. The chicken will continue cooking slightly from carryover heat while the sauce reduces. Undercooked is better than overcooked—you can always return it to the pan briefly if needed. |
| Adding cold heavy cream directly to boiling-hot liquid | The thermal shock causes casein proteins in the cream to denature instantly and precipitate out of suspension. The cream breaks apart, separating into greasy fat pools floating on top with watery, curdled solids at the bottom. The emulsion collapses irreversibly and the sauce tastes broken and unpleasant instead of silky and velvety. | Reduce heat to low (approximately 160-170°F / 71-77°C on the thermometer) before adding cold cream. Stir the cream in slowly, allowing the temperature gradient to be gradual instead of shocking. Pour from a height to incorporate air, which helps stabilize the emulsion. The slower you add it, the better it integrates. |
| Burning the garlic by adding it too early or at too high heat | Fresh garlic’s allicin compounds break down under sustained high heat above 300°F / 149°C. After about 60-90 seconds at high heat, aromatic compounds convert into bitter, pungent sulfur compounds that taste acrid and metallic instead of sweet and mellow. You end up with harsh, burnt-tasting notes that dominate the entire sauce and can’t be masked or fixed. | Add minced fresh garlic only after you’ve seared the chicken and removed it from the pan. Add the garlic to the pan after reducing heat to medium. Stir constantly for 30-45 seconds until fragrant, then immediately add the stock and sun-dried tomatoes to lower the temperature. This brief, controlled heating releases aromatic compounds without burning. |
| Using thick, un-pounded chicken breasts | Thick chicken breasts don’t cook evenly. The exterior can reach 165°F / 74°C while the interior is still 145°F / 63°C raw and mushy. Alternatively, if you leave it cooking long enough for the center to reach doneness, the exterior becomes overcooked and chalky. You end up with inconsistent texture throughout the piece—partly rubbery, partly mushy, never uniformly succulent. | Pound the chicken breasts to uniform thickness of approximately 0.75 to 1 inch / 1.9 to 2.5cm using a meat mallet or the bottom of a heavy pan. Place between plastic wrap and pound gently but firmly until the entire piece is uniform thickness. This ensures even heat penetration and simultaneous doneness throughout. |
| Adding cream too early in the cooking process before the chicken has seared | If you add cream before searing the chicken, the chicken steams instead of browning. The liquid prevents the high-heat Maillard reaction from occurring on the chicken surface. You lose the golden-brown crust and the complex flavor compounds that make the dish taste elegant instead of pale and bland. The chicken tastes like it was poached instead of seared. | Sear the chicken completely first, developing a golden-brown surface through high-heat Maillard reactions. Remove the chicken from the pan temporarily. Deglaze the pan with stock, adding aromatics and sun-dried tomatoes, reducing slightly over medium heat. Only then add the cream when the chicken is returning to the pan. This sequencing builds flavor layers. |
| Using low-fat milk or half-and-half instead of full-fat heavy cream | Low-fat dairy contains insufficient milk solids and fat content to stabilize against the acidic sun-dried tomatoes. The casein proteins are diluted, and the water-based portion separates from what little fat is present under heat. The sauce becomes thin, watery, and breaks apart instead of creating a unified, velvety coating that clings to the chicken. | Always use heavy whipping cream (36-40% butterfat minimum). The higher lipid content provides enough fat molecules to bind with the liquid and acidic components, creating a stable emulsion. European-style cream with 40%+ butterfat creates the richest, most stable sauce. Do not substitute—cream is non-negotiable for this dish to succeed. |
Master Step-by-Step Method
Surface Maillard Searing and Protein Setting Phase
Begin by patting your chicken breasts completely dry with paper towels. Moisture on the surface prevents the high-heat Maillard browning reaction from occurring. Spend 30 seconds per breast rubbing away surface moisture.
Season the dried chicken breasts generously on both sides with coarse sea salt and cracked black pepper. The salt penetrates the protein structure and helps the chicken retain moisture during cooking. Don’t be shy with seasoning—it distributes flavor throughout the meat, not just the surface.
Heat a large skillet (ideally 12 inches / 30cm) over medium-high heat for 2-3 minutes until the pan surface is hot. Add 2 tablespoons / 28g of whole unsalted butter and swirl to coat the entire bottom. The butter should foam immediately and smell nutty.
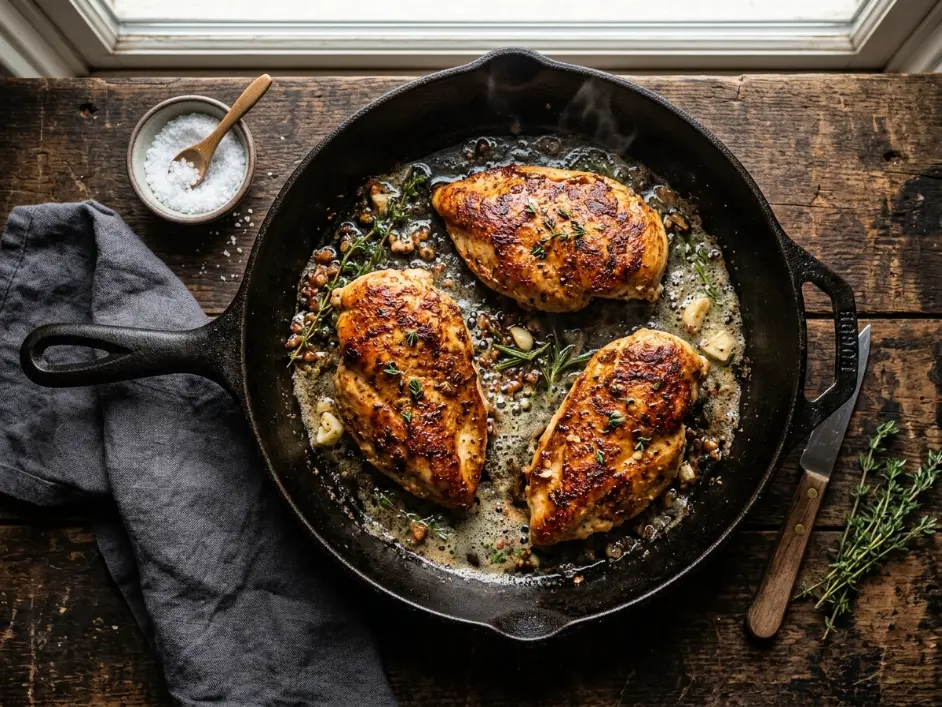
Place the seasoned chicken breasts into the hot butter in a single uncrowded layer. You should hear an aggressive sizzle—that’s the Maillard reaction beginning. Do not move the chicken. Let it sit undisturbed for 4-5 minutes, developing a golden-brown crust on the underside.
Flip the chicken breasts using tongs and cook the second side for 3-4 minutes until the surface develops similar golden-brown coloring. The chicken will not yet be fully cooked internally—we’re developing crust and flavor first. The internal temperature should read approximately 155°F / 68°C at this point.
Deglazing the Fond and Building the Sauce Base Phase
Remove the partially-cooked chicken from the skillet and set aside on a clean plate. The chicken is not yet fully cooked—it will finish cooking in the sauce.
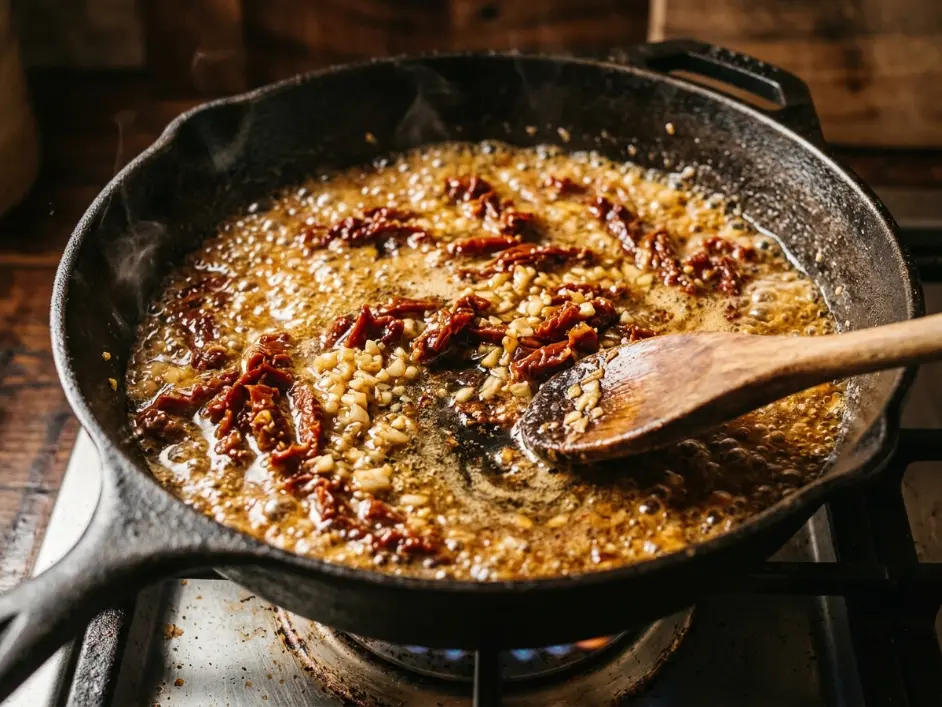
Add the finely minced shallot to the same hot skillet and stir constantly for 30 seconds, scraping up all the stuck brown bits at the pan bottom—the fond. This fond is pure umami and flavor concentration. Don’t waste it.
Immediately add the minced fresh garlic to the pan and stir continuously for 30-45 seconds until fragrant. The moment you smell mellow, toasted garlic (not burnt), proceed immediately.
Pour 0.5 cup / 120ml of low-sodium chicken stock into the pan, using a wooden spoon to scrape and dissolve any remaining stuck fond. The stock should sizzle and partially evaporate, concentrating the flavors.
Add the 0.75 cup / 120g of sun-dried tomatoes to the pan and stir to combine. The tomatoes will begin softening and releasing their concentrated flavors into the liquid. Reduce the heat to medium.
Low-Velocity Cream Reduction Liaison and Final Assembly Phase
Reduce the heat to low (approximately 160-170°F / 71-77°C—the pan should be just barely simmering, not boiling). This temperature reduction is absolutely critical before you add the cream.
Slowly pour 1.5 cups / 360ml of heavy whipping cream into the pan while stirring constantly. Pour from a height to incorporate air, which helps stabilize the emulsion. The cream should integrate smoothly into the pan juices without breaking or curdling.
Stir the mixture gently for 2-3 minutes, allowing the cream to fully incorporate and begin reducing slightly. The sauce will deepen in color from the sun-dried tomatoes, creating a rich red-orange hue.
Return the partially-cooked chicken breasts to the pan, nestling them into the sauce. The chicken should be at least 50% submerged in the cream sauce. Reduce heat to the absolute minimum (low setting on your burner).
Cook gently for 5-7 minutes without boiling. The residual heat combined with gentle simmering will bring the chicken internal temperature from 155°F / 68°C to exactly 165°F / 74°C without causing the cream to break or the chicken to overcook.
Check the chicken doneness at the 6-minute mark by inserting an instant-read thermometer into the thickest part of the largest breast. You’re aiming for 165°F / 74°C. Once it reaches this temperature, remove immediately.
Taste the sauce and adjust seasoning with additional salt and pepper as needed. Add approximately 1 tablespoon / 15ml of fresh lemon juice to brighten the flavors and cut through the richness of the cream.
Remove from heat and gently stir in 0.75 cup / 75g of freshly grated Parmigiano-Reggiano cheese and the fresh thyme sprigs. The residual heat will melt the cheese into the sauce, creating additional umami depth without needing further cooking.
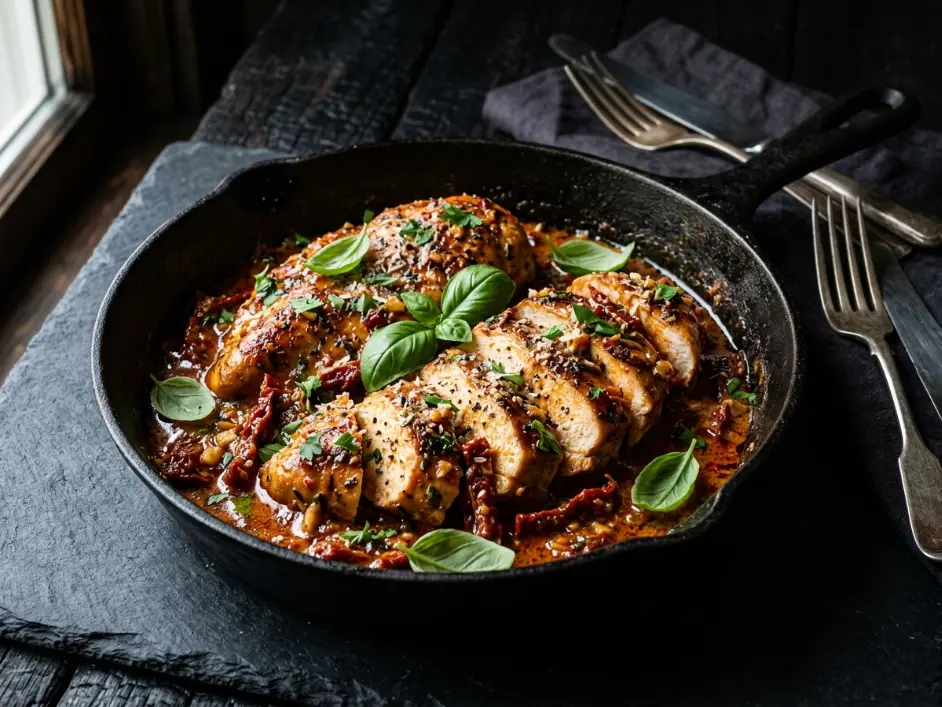
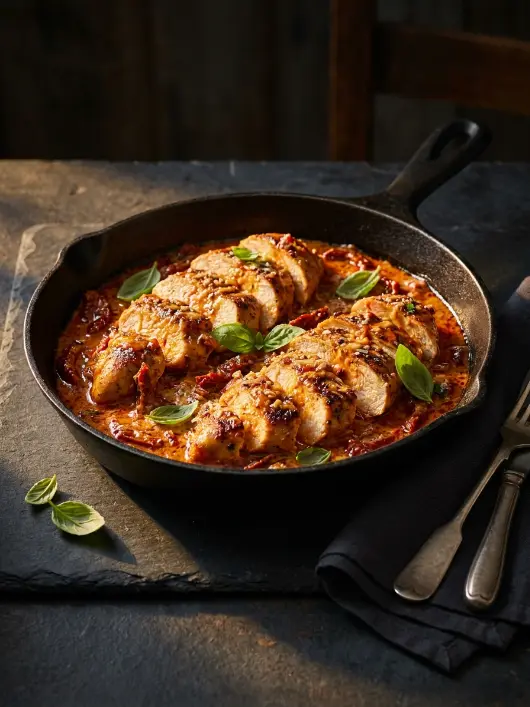
Slice the cooked chicken breasts into 0.75-inch / 2cm thick pieces and arrange on serving plates. Spoon the rich cream sauce generously over everything, ensuring each portion gets sun-dried tomato shards and fresh herbs.
Garnish with fresh basil leaves (finely sliced) scattered across just before serving. The basil should be added at the last moment—its aromatic volatiles are maximized when fresh and not exposed to heat.
Advanced texture-building techniques thoroughly mapped out over at Serious Eats prove why precision timing and surface management loops ensure absolute success in one-pot chicken cooking. The difference between mediocre and extraordinary is respecting the myofibrillar protein denaturation curves and understanding emulsion physics at a molecular level.
Cooking is not just chemistry — it is memory made edible. When others gather around a table and tear off that first piece of warm, crunchy bread to plunge it into a bubbling, velvety center, the science fades away and pure connection takes over. The most powerful moves in the kitchen are almost always the quiet ones. The overnight rest. The proper preheat. The two-minute wait before you plate. It is the patience to wring out every last drop of moisture from your greens, and the care you take in picking the right cheese. Take your time, respect the process, and your kitchen will always reward you. — Chef Joseph | Expert Palate
4 Unrivaled Thermal Laws to Prevent Disastrous Soggy Crispy Sheet Pan Greek Chicken Thighs
Technical Data & Nutrition Table
| Nutrient | Per Serving (Approximately 6 oz / 170g Chicken with 0.75 cup / 180ml Sauce) |
|---|---|
| Calories | 485 kcal |
| Protein | 48g |
| Total Fat | 26g |
| Saturated Fat | 14g |
| Carbohydrates | 12g |
| Dietary Fiber | 2g |
| Sodium | 620mg |
| Cholesterol | 145mg |
Note: Nutrition values are careful kitchen estimates based on standard ingredient composition databases. Actual values may vary depending on specific chicken sourcing, cream brand, and sun-dried tomato oil content.
Food Safety & Thermal Management
Chicken breast requires reaching a safe internal core temperature of 165∘F/74∘C throughout the thickest part of the meat to eliminate any potential pathogens. Insert an instant-read thermometer into the center without touching bone (there is no bone in boneless breasts). Let the thermometer sit for 3 seconds before reading the final temperature.
The standard danger zone for bacterial growth in poultry occurs between 40∘F−140∘F/4∘C−60∘C. Never leave your prepared one-pot creamy sun-dried tomato chicken breast sitting at room temperature for more than 2 hours. Once cooked and the chicken reaches 165∘F/74∘C, it must remain above 140∘F/60∘C during storage or service.
Executing large-batch culinary spreads safely for hot gatherings or buffet lines requires adhering to the safe holding parameters curated over at the Food Network. For hot holding, keep finished chicken and sauce on a warming tray or in a low oven at 140−150∘F/60−65∘C for no longer than 2 hours. Beyond this time window, the cream sauce begins separating and the chicken continues cooking internally, becoming drier and less succulent.
Storage & Reheating Matrix
| Storage State | Fridge Limit | Freezer Option | Best Reheating Method |
|---|---|---|---|
| Fully Cooked Chicken Slices with Creamy Sun-Dried Tomato Sauce | 3-4 days in airtight container | Up to 2 months in freezer-safe container, though texture quality degrades upon thawing. The cream emulsion separates and the chicken becomes slightly drier. | Reheat gently in a covered skillet over low-medium heat with 2-3 tablespoons of chicken stock or water for 6-8 minutes, stirring occasionally. The gentle heat and added liquid help re-emulsify the sauce without breaking it further. Alternatively, cover a plate with damp paper towel, place the chicken and sauce on top, and microwave at 30% power for 2-3 minutes, checking frequently. Never use full microwave power—intense electromagnetic radiation instantly breaks the cream emulsion and turns the chicken into rubber. |
| Cooked Chicken Only (Without Sauce or Sun-Dried Tomatoes) | 3-4 days in airtight container | Up to 3 months in vacuum-sealed bag | Reheat gently in a covered skillet over low heat for 3-4 minutes with a tiny splash of chicken stock. Watch carefully—reheated chicken can dry out quickly. Alternatively, shred cold chicken and incorporate into pasta, salads, or grain bowls where additional moisture from other components masks any texture degradation. |
| Creamy Sun-Dried Tomato Sauce Only (Without Chicken) | 3 days covered in refrigerator | Up to 1.5 months in ice cube trays frozen, then transferred to freezer bag for portion control | Thaw overnight in refrigerator. Gently reheat in a saucepan over low heat, stirring occasionally. If the sauce has thickened excessively or begun separating, whisk in 1-2 tablespoons of heavy cream off-heat to temporarily re-emulsify. Fresh-made sauce is always superior to reheated, but this works acceptably. |
One-Pot Creamy Sun-Dried Tomato Chicken Breast
Ingredients
Equipment
Method
- Pat chicken breasts completely dry with paper towels spending thirty seconds per breast removing all surface moisture to enable high-heat Maillard browning reaction.
- Season dried chicken breasts generously on both sides with coarse sea salt and cracked black pepper allowing salt to penetrate protein structure for moisture retention.
- Heat large skillet over medium-high heat for two to three minutes until pan surface is hot adding whole unsalted butter that should foam immediately and smell nutty.
- Place seasoned chicken breasts into hot butter in single uncrowded layer hearing aggressive sizzle indicating Maillard reaction beginning and letting them sit undisturbed for four to five minutes developing golden-brown crust.
- Flip chicken breasts using tongs and cook second side for three to four minutes until surface develops similar golden-brown coloring with internal temperature reaching approximately one hundred fifty-five degrees Fahrenheit.
- Remove partially-cooked chicken from skillet and set aside on clean plate as chicken is not yet fully cooked and will finish cooking in sauce.
- Add finely minced shallot to same hot skillet and stir constantly for thirty seconds scraping up all stuck brown bits at pan bottom which is pure umami fond.
- Add minced fresh garlic to pan immediately and stir continuously for thirty to forty-five seconds until fragrant smelling mellow toasted garlic not burnt.
- Pour low-sodium chicken stock into pan using wooden spoon to scrape and dissolve any remaining stuck fond with stock sizzling and partially evaporating concentrating flavors.
- Add oil-packed sun-dried tomatoes to pan and stir to combine allowing tomatoes to begin softening and releasing concentrated flavors into liquid.
- Reduce heat to low approximately one hundred sixty to one hundred seventy degrees Fahrenheit with pan just barely simmering not boiling.
- Slowly pour heavy whipping cream into pan while stirring constantly pouring from height to incorporate air which helps stabilize emulsion.
- Stir cream mixture gently for two to three minutes allowing cream to fully incorporate and begin reducing slightly with sauce deepening in color from sun-dried tomatoes creating rich red-orange hue.
- Return partially-cooked chicken breasts to pan nestling them into sauce with chicken at least fifty percent submerged in cream sauce.
- Cook gently for five to seven minutes without boiling with residual heat combined with gentle simmering bringing chicken internal temperature from one hundred fifty-five degrees to exactly one hundred sixty-five degrees.
- Check chicken doneness at six-minute mark by inserting instant-read thermometer into thickest part aiming for one hundred sixty-five degrees Fahrenheit and removing immediately when temperature reached.
- Taste sauce and adjust seasoning with additional salt and pepper as needed adding approximately one tablespoon fresh lemon juice to brighten flavors and cut through richness.
- Remove from heat and gently stir in freshly grated Parmigiano-Reggiano cheese and fresh thyme sprigs with residual heat melting cheese into sauce creating additional umami depth.
- Slice cooked chicken breasts into three-quarter inch thick pieces and arrange on serving plates.
- Spoon rich cream sauce generously over everything ensuring each portion receives sun-dried tomato shards and fresh herbs.
- Garnish with fresh basil leaves finely sliced scattered across just before serving with basil aromatic volatiles maximized when fresh and not exposed to heat.
Notes
Reduce heat to low before adding heavy cream preventing thermal shock that causes casein proteins to denature and emulsion to break into separated greasy pools.
Add fresh minced garlic only after heat reduction for thirty to forty-five seconds to release aromatic compounds without burning creating harsh acrid flavors that dominate sauce.
Use instant-read thermometer to verify exactly one hundred sixty-five degrees Fahrenheit internal temperature removing chicken immediately to prevent overcooking and moisture loss.
Pound chicken breasts to uniform thickness of approximately three-quarter to one inch ensuring even heat penetration and simultaneous doneness throughout preventing dry edges.
Frequently Asked Culinary Questions
Why did my cream sauce break into separated greasy pools instead of staying silky and unified?
The most common cause is adding cold cream directly to boiling-hot sauce above 180°F / 82°C. The thermal shock denatures the casein proteins, causing them to precipitate out of suspension. Always reduce heat to low before adding cream, then pour slowly while stirring. The gradual temperature change allows the cream to integrate smoothly instead of breaking.
Can I use milk instead of heavy cream to reduce calories?
Technically you can, but the result won’t be the same. Milk (whether whole or low-fat) lacks the butterfat and milk solid density needed to stabilize against the acidic sun-dried tomatoes. The sauce will be thin and watery instead of silky and clinging. If you must use milk, add a cornstarch slurry (1 tablespoon cornstarch mixed with 2 tablespoons water) to help thicken and stabilize, but understand you’re compromising the dish’s elegance.
What’s the difference between sun-dried tomatoes that are oil-packed versus dry-packed?
Oil-packed tomatoes retain enzymatic activity and don’t become tough when rehydrated in the sauce. Dry-packed tomatoes must be rehydrated in water first, then drained. If you use dry-packed without rehydrating, they absorb too much liquid from the cream sauce and become leathery. For this recipe, oil-packed is superior because they already contain sufficient moisture and integrate seamlessly without pre-treatment.
Why is my chicken turning out chalky and dry inside even though I’m hitting the right temperature?
You might be cooking too long. Once the internal temperature reaches 165°F / 74°C, remove immediately. Some carryover cooking will continue pushing the temperature slightly higher. Additionally, ensure you’re using air-chilled chicken breast—water-chilled versions are already waterlogged and lose moisture faster during cooking. Pounding the chicken to uniform thickness also ensures even cooking without dry edges.
Can I pound the chicken ahead of time or does it need to be pounded fresh?
You can pound the chicken up to 6 hours ahead and refrigerate it between plastic wrap. This actually helps—pounding begins breaking down connective tissue and protein fibers, making the meat tender. However, ensure you pat the pounded chicken dry with paper towels again right before searing, as pounding releases surface moisture. Proceed with high-heat searing immediately before the chicken absorbs too much moisture.